'%3e%3cpath%20fill='%23C0E1E2'%20d='M7%200H4v20h3V0Z'%20/%3e%3cpath%20fill='%23C0E1E2'%20d='M16%2010h-3v10h3V10Z'%20/%3e%3cpath%20fill='%23C0E1E2'%20d='M0%2013v3h20v-3H0Z'%20/%3e%3cpath%20fill='%23C0E1E2'%20d='M0%204v3h10V4H0Z'%20/%3e%3cpath%20fill='%2360B2B6'%20d='M19.996%204v3H13V0h3v4h3.996Z'%20/%3e%3c/g%3e%3cdefs%3e%3cclipPath%20id='clip0_1029_1800'%3e%3cpath%20fill='%23fff'%20d='M0%200h20v20H0z'%20/%3e%3c/clipPath%3e%3c/defs%3e%3c/svg%3e) Data Editor
Data Editor  Subscribe
 CLI Agents Part 2: Claude Code Best Practices
In the first part, we explored why CLI agents are the future of AI-assisted coding. Now it's time to get practical. This article covers what actually makes Claude Code effective: proper configuration, context management, permission modes, subagents, custom commands, and MCP integration. This information is useful not only for Business Central developers, but for virtually any specialist in any domain.
- CLI Agents: The New Standard of AI Coding
- CLI Agents Part 2: Claude Code Best Practices
- CLI Agents Part 3: Business Central MCP Server
- CLI Agents Part 4: Practical Use
Agenda
- CLAUDE.md
- Run Claude Code with different flags
- Context Management
- Subagents
- Custom slash commands aka Skills
- MCP
- Multi-Claude Workflows
- Summary
CLAUDE.md
The CLAUDE.md file is the most important element for effective Claude Code usage. This is a special file that Claude automatically pulls into context when starting a conversation. Think of it as Claude's rules for your project. Every conversation will include information from CLAUDE.md. This is a text file with special instructions for the agent that can contain the following:
- How to test/run/build the project
- Code style rules and architectural boundaries
- Repo-specific conventions (naming, folder structure, patterns)
- Safety rails “Don’t do this” (no direct prod changes, no secret printing, etc.)
- How to write PR-ready changes (tests, docs, changelog expectations)
Tip: If you find that "Do not..." rules are being ignored, try rephrasing them as "Prefer X over Y". This positive guidance pattern works more reliably, especially in sessions with large context.
There are no strict rules for creating a CLAUDE.md, but there are general recommendations worth following. Try to keep the amount of text as small as possible, and make the instructions simple and clear. For example, if your project is built with a specific local command, state it explicitly in the file:
# Build
- `<yourBuildCommand>`
You can also create multiple CLAUDE.md files at the same time, and all of them will be included in the agent’s context. For instance, you can keep a project level CLAUDE.md in the project root folder ./CLAUDE.md or ./.claude/CLAUDE.md with general rules and navigation, and then add more specific instructions in child folders for each component.
Claude Code also allows you to create and use a global CLAUDE.md across all projects. This can be very convenient if you have common rules for how you work with projects. You can create the file at ~\.claude\CLAUDE.md, which on Windows is equivalent to:
C:\Users\YourName\.claude\CLAUDE.md
That means each CLAUDE.md from different directory levels will be added to the context of your prompts. In fact, there are more levels than just the project level and the global level. You can read more about these levels in the Claude Code documentation:
https://code.claude.com/docs/en/settings
You can also try to initialize a project-level CLAUDE.md using the /init command. Claude Code will attempt to read the overall project structure and generate the file. In practice, however, it often produces a fairly unoptimized and somewhat random result, so it is better not to rely on it.
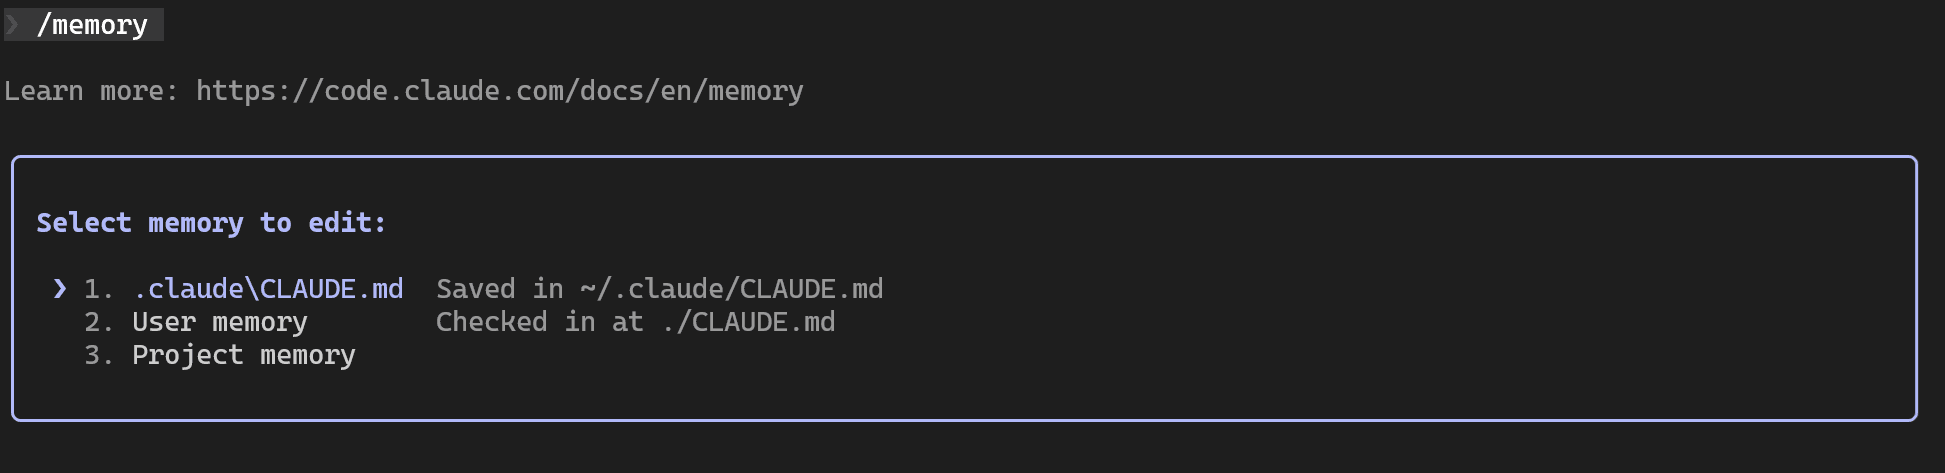
By the way, you can use the /memory command to see which CLAUDE.md files are currently active, and you can even edit them directly from the terminal:
I have prepared a example of a CLAUDE.md that should work for any Business Central project written in AL. Of course, it is far from complete, this is simply an example of what such a file could look like for a project.
# CLAUDE.md — Business Central (AL) Repository Instructions

This repository contains Microsoft Dynamics 365 Business Central AL extensions.

## Repository structure
- `app/`
  - Main extension (production code)
  - Contains `app/app.json`
  - Local package cache: `app/.alpackages/`
- `test/`
  - Test extension (AL tests)
  - Contains `test/app.json`
  - Local package cache: `test/.alpackages/`
- `.github/workflows/`
  - CI pipelines (GitHub Actions)

## Goal & working style
- Make the smallest correct change that satisfies the requirement.
- Prefer additive changes (new codeunits/extensions) over risky rewrites.
- Avoid broad formatting-only changes across many files.
- Keep changes reviewable: small diffs, clear naming, tests updated.

---

# 1) How to build / compile (article-friendly, repo-relative)

## Compile main extension (`app/`)
### Bash (Git Bash / WSL bash)
Bash(alc.exe /project:"$(pwd)/app" /packagecachepath:"$(pwd)/app/.alpackages")

### PowerShell
PowerShell(alc.exe /project:"$PWD\app" /packagecachepath:"$PWD\app\.alpackages")

## Compile test extension (`test/`)
> Compile `app/` first, then `test/` (tests usually depend on the app).

### Bash (Git Bash / WSL bash)
Bash(alc.exe /project:"$(pwd)/test" /packagecachepath:"$(pwd)/test/.alpackages")

### PowerShell
PowerShell(alc.exe /project:"$PWD\test" /packagecachepath:"$PWD\test\.alpackages")

### Notes
- `alc.exe` is the AL compiler used by the VS Code AL extension. If it is not on PATH, locate it once and call it via full path, or use your existing build scripts/CI tasks that wrap it.
- Keep package caches separate: `app/.alpackages` and `test/.alpackages`.
- Always check both `app/app.json` and `test/app.json` for:
  - `platform`, `application`, `runtime`
  - dependency references (test app depends on main app)

---

# 2) Development workflow (default)
When implementing a task:
1. Identify whether change belongs in `app/` or `test/`.
2. Locate relevant objects using search (`rg`, VS Code search).
3. Read the existing pattern in this repo and follow it.
4. Implement the minimal change.
5. Update / add tests in `test/` when behavior changes.
6. Compile `app/`, then compile `test/`.
7. Provide a short summary and verification steps.

Definition of done:
- Code compiles.
- Tests updated/added (if behavior changed).
- No unnecessary refactors.
- No secrets or environment-specific paths added.

---

# 3) AL best practices (must follow)

## 3.1 Object design & extensibility
- Keep business logic out of pages where possible:
  - UI triggers should call codeunits.
- Use events responsibly:
  - Publish integration events for extensibility when introducing new behavior that partners may need.
  - Subscribe with minimal scope and clear naming.
- Avoid hard dependencies on UI when logic is domain-level.

## 3.2 Naming & file organization
- Use consistent object naming:
  - App objects: `Something Something` with your established prefix pattern used in this repo.
  - Test objects: include `Test` in object name where appropriate.
- Suggested folder pattern inside each app folder:
  - `app/src/` for AL objects
  - `app/src/codeunits/`, `app/src/tables/`, `app/src/pages/`, etc. (if repo already follows it)
  - Same idea for `test/src/`
- One object per file.
- Keep file names readable and aligned with object names.

## 3.3 Performance & data access
- Prefer set-based operations and filters over loops:
  - Use `SetRange/SetFilter` + `FindSet` instead of iterating unfiltered data.
- Use the right find pattern:
  - `FindSet()` for iteration
  - `FindFirst()` only when you truly need one first record
  - `FindLast()` only when you truly need one last record
  - `IsEmpty()` when you just need to check records avaibility without reading
- Always minimize loaded fields when beneficial:
  - Use `SetLoadFields(...)` for large tables / hot paths.
- Avoid `CalcFields` in loops unless required, calculate once or batch if possible with `SetAutoCalcFields`.
- Use appropriate keys:
  - Ensure filters align with keys for performance.
- Avoid repeated record lookups inside loops; cache where safe.
- Control record isolation level when it's appropriate with `Rec.ReadIsolation := IsolationLevel::{IsolationLevel}` pattern

## 3.4 Transactions & locking
- Avoid unnecessary `COMMIT`.
- If `COMMIT` is required, explicitly explain why (integration boundary, long process, etc.).
- Be careful with `LOCKTABLE` and long-running transactions.
- Do not use `TryFunction` patterns for recoverable operations; do not hide errors silently.

## 3.5 Error handling & messages
- Use `Error(...)` for business rule violations.
- Prefer clear, actionable error messages:
  - Include identifiers (Document No., Line No., Item No.) when relevant.
- Use global text constants instead of hardcoded text values.
- Use `if GuiAllowed() then` pattern for messages.
- Do not rely on implicit behavior; validate inputs.
- Do not swallow exceptions unless it is an intentional, documented choice.

## 3.6 Permissions & security
- Do not log secrets or sensitive data.
- If you introduce new permission needs:
  - Add/update permission sets as required by your repo conventions.
- Avoid overly broad permissions.

## 3.7 App metadata discipline (app.json)
- Changes must respect the targets in `app.json`:
  - `platform`, `application`, `runtime` must remain compatible.
- If you change public surface area (events, APIs, tables/fields):
  - Consider versioning implications.
  - Consider upgrade path if relevant.
- Test extension (`test/app.json`) should reference the main app dependency correctly.

---

# 4) Testing rules (Business Central AL tests)

## 4.1 Where tests live
- All automated tests belong in `test/` (not in `app/`).
- Tests should focus on behavior, not implementation details.

## 4.2 Test codeunit conventions
- Use `codeunit ... Subtype = Test`.
- Keep tests deterministic:
  - Avoid relying on existing tenant data.
  - Create the minimal required data within the test.
- Use standard test libraries where available (e.g., Assert patterns) following repo conventions.

## 4.3 What to test
- For bug fixes: add a regression test that would fail before the fix.
- For new logic: add tests for:
  - happy path
  - edge cases
  - validation errors
- Prefer a few strong tests over many brittle ones.

## 4.4 UI / integration tests
- Avoid UI-driven tests unless necessary.
- If UI handlers are required, keep them minimal and stable.

---

# 5) CI / GitHub Workflows (`.github/workflows/`)
- Treat workflows as production infrastructure:
  - Avoid unnecessary churn.
  - Do not modify secrets usage.
- If changing workflows:
  - Explain why and how it impacts build/test/publish.
  - Keep changes minimal and reversible.

---

# 6) What to do when you’re unsure
- First check:
  - `app/app.json` and `test/app.json`
  - existing patterns in the repo
  - CI workflow steps
- If ambiguity remains:
  - propose the safest default behavior
  - call out tradeoffs explicitly
  - avoid wide refactors
Run Claude Code with different flags
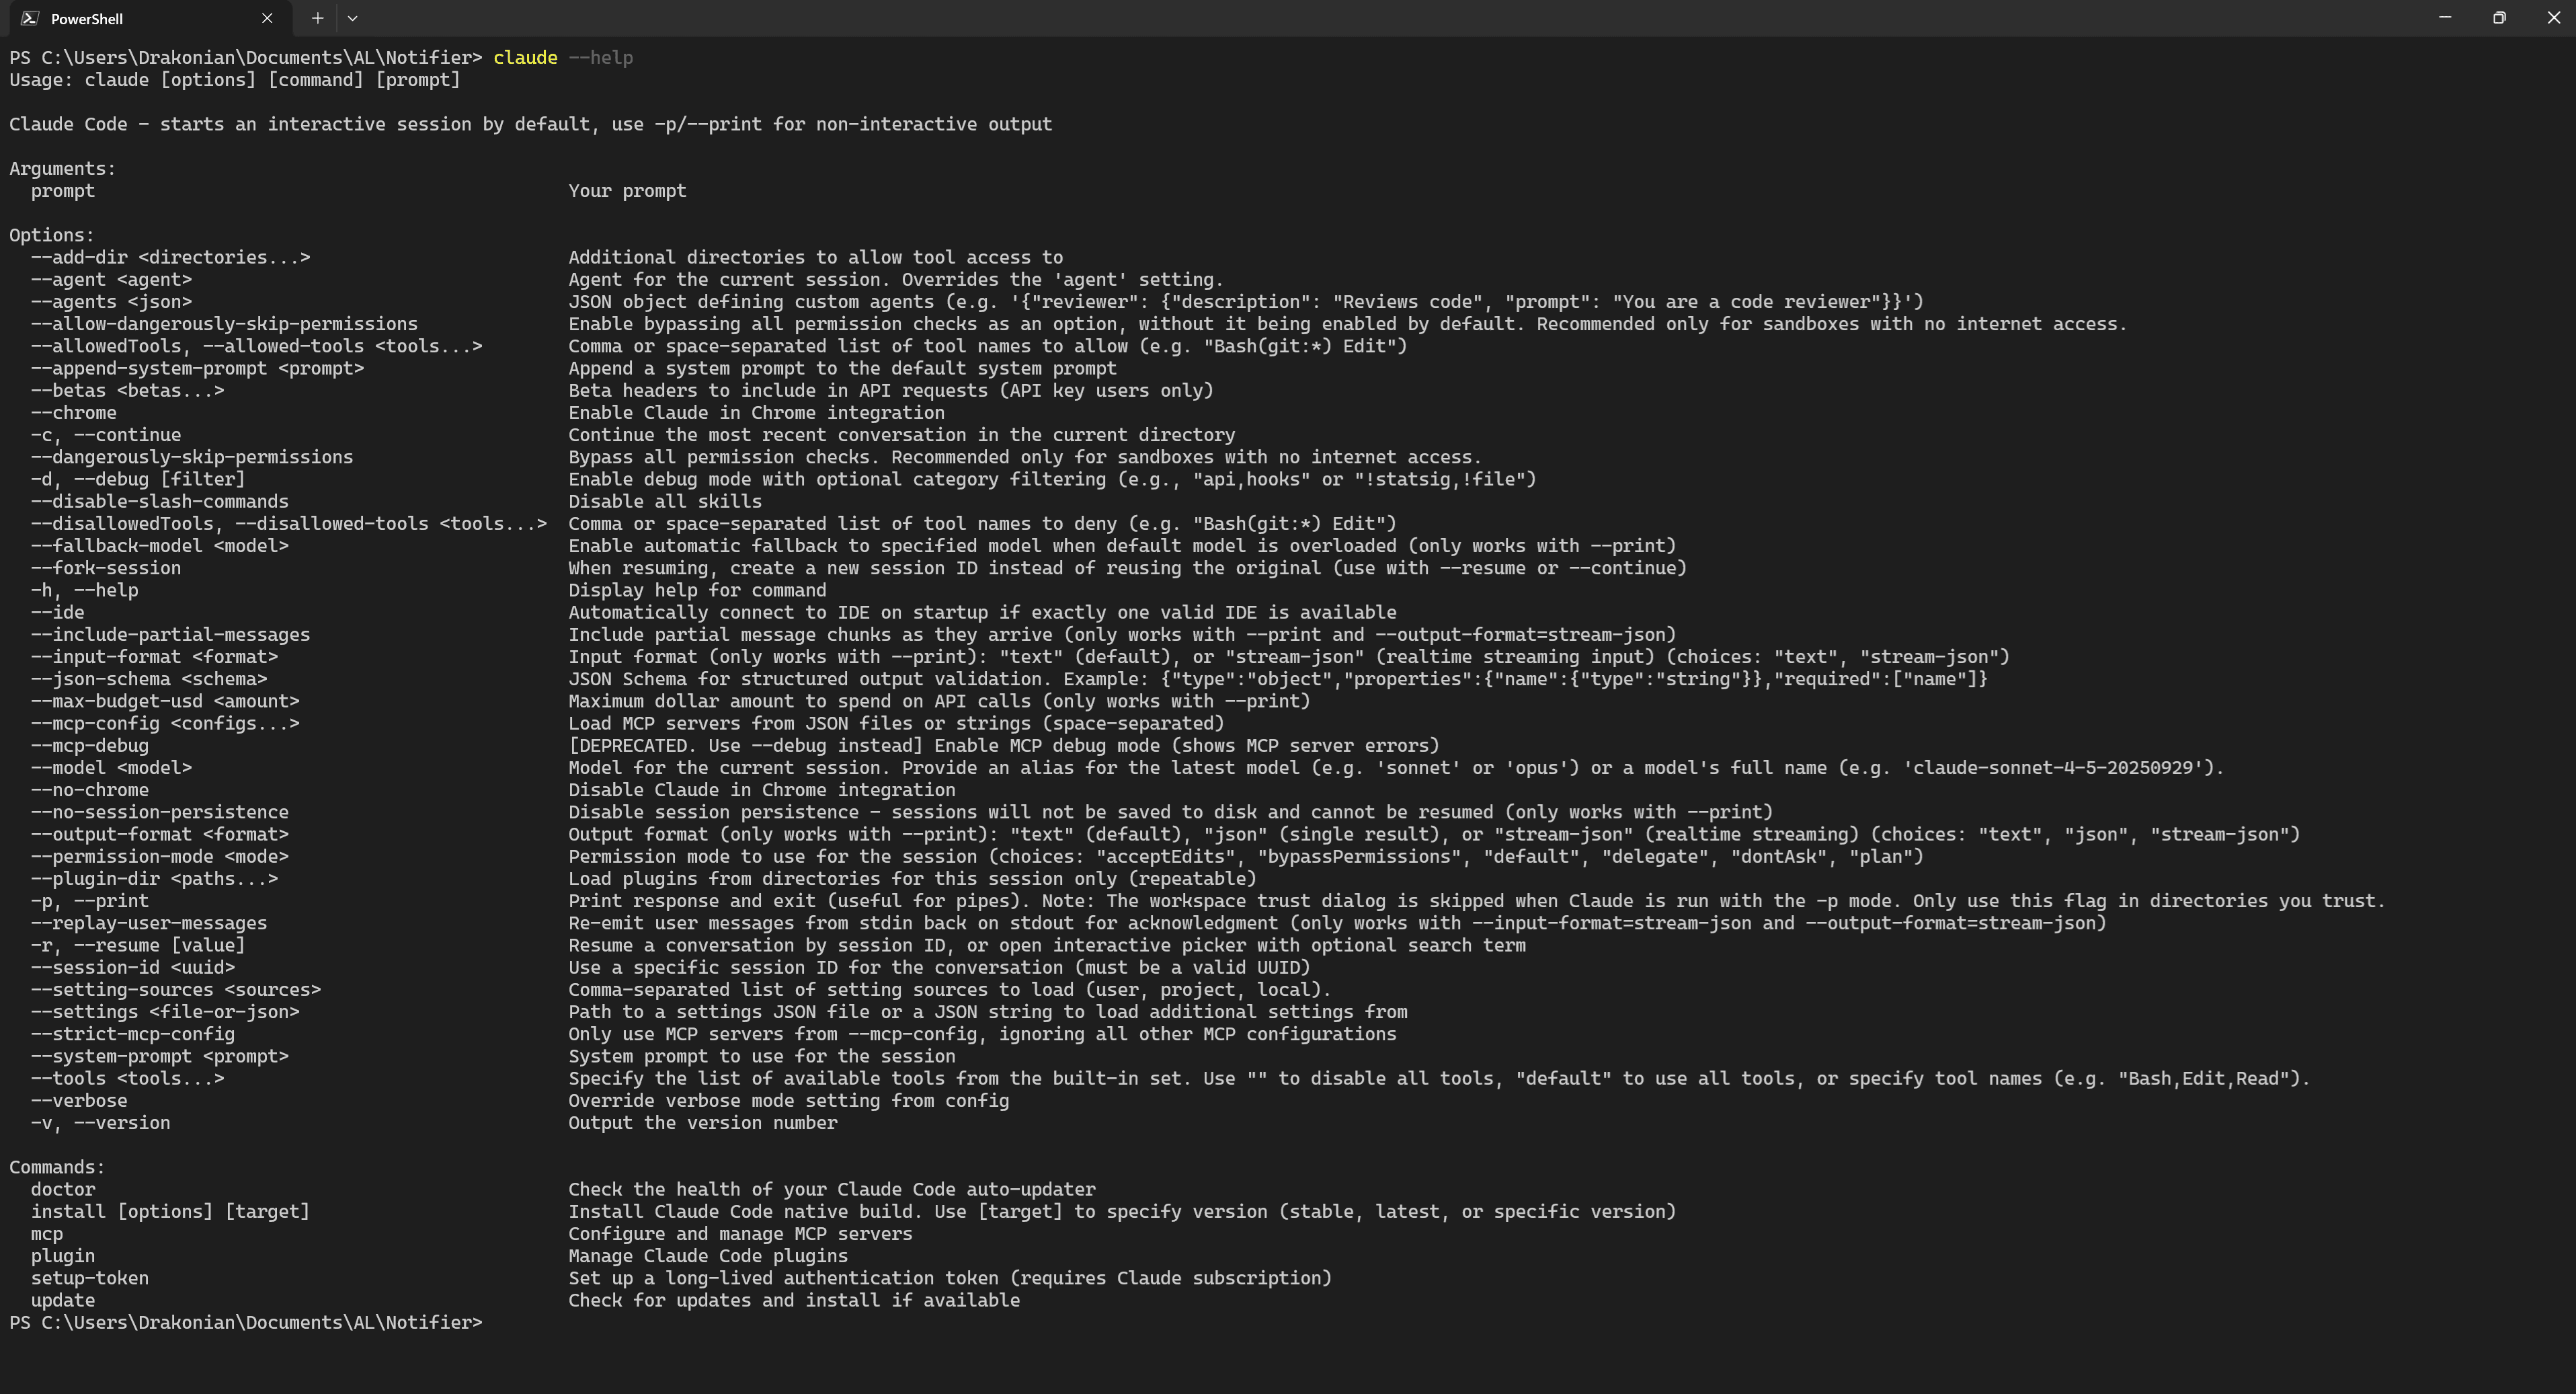
You can run Claude Code with different settings and modes. To see a detailed description of these options, use the claude --help command in the terminal.
I recommend paying attention to the --permission-mode flag, as it allows you to control how Claude Code interacts with files and tool calling, you can read about modes here.
| Mode | Flag Value | Description | Best Use Case |
|---|---|---|---|
| Default | default |
Standard behavior — prompts for permission on first use of each tool | Normal development, safety-first |
| Accept Edits | acceptEdits |
Auto-approves file edits; other tools (bash, MCP) still require permission | Prototyping, fast iteration on trusted code |
| Plan | plan |
Read-only mode — can analyze but cannot modify files or execute commands | Codebase exploration, architecture planning |
| Don't Ask | dontAsk |
Auto-denies all tools unless explicitly permitted by an allow rule in settings.json. No prompts are shown | CI/CD, batch processing, non-interactive environments |
| Delegate | delegate |
Related to subagent delegation workflows (currently undocumented) | Subagent workflows |
| Bypass Permissions | bypassPermissions |
Skips ALL permission prompts — full system access | Containers, isolated environments only |
For example, you can run Claude Code in a mode where it will automatically perform any actions on files and call any tools without asking.
claude --permission-mode bypassPermissions
or
claude --dangerously-skip-permissions
Of course, this is very dangerous and should only be used in an isolated environment, but it provides maximum autonomy.
Context Management
Context is everything AI Agent "sees" and "remembers" during a single conversation session. So, it is AI Agent working memory, a limited space where all information must fit. In case of Claude Code context includes:
- Your prompts and questions
- Claude's responses
- Files Claude has read
- Command outputs (bash, tests, linters)
- Tool call results
- CLAUDE.md content
- Conversation history
And the context window is limited by the constraints of the specific LLM model. This is a very simplified explanation, you can read a more detailed description in the official documentation.
If you look at the context window of Anthropic’s latest models, you will see that the stated default is 200k tokens. However, I would treat these limits with caution, the reality is that the more information you put into the context, the worse the results can become.
In practice, when working with AI agents we are always balancing between providing enough context to solve the task and overloading the context window. That is why we should always aim to describe the task in the smallest and most concise way possible.
What happens when the context window gets close to its limit? Claude Code will automatically run /compact, which essentially summarizes the conversation and keeps only the essential information. This means that important context details can be lost during summarization. In addition, we also lose part of the context window because the summary itself takes up space. And as I mentioned earlier, the more free space you have in the context window, the better.
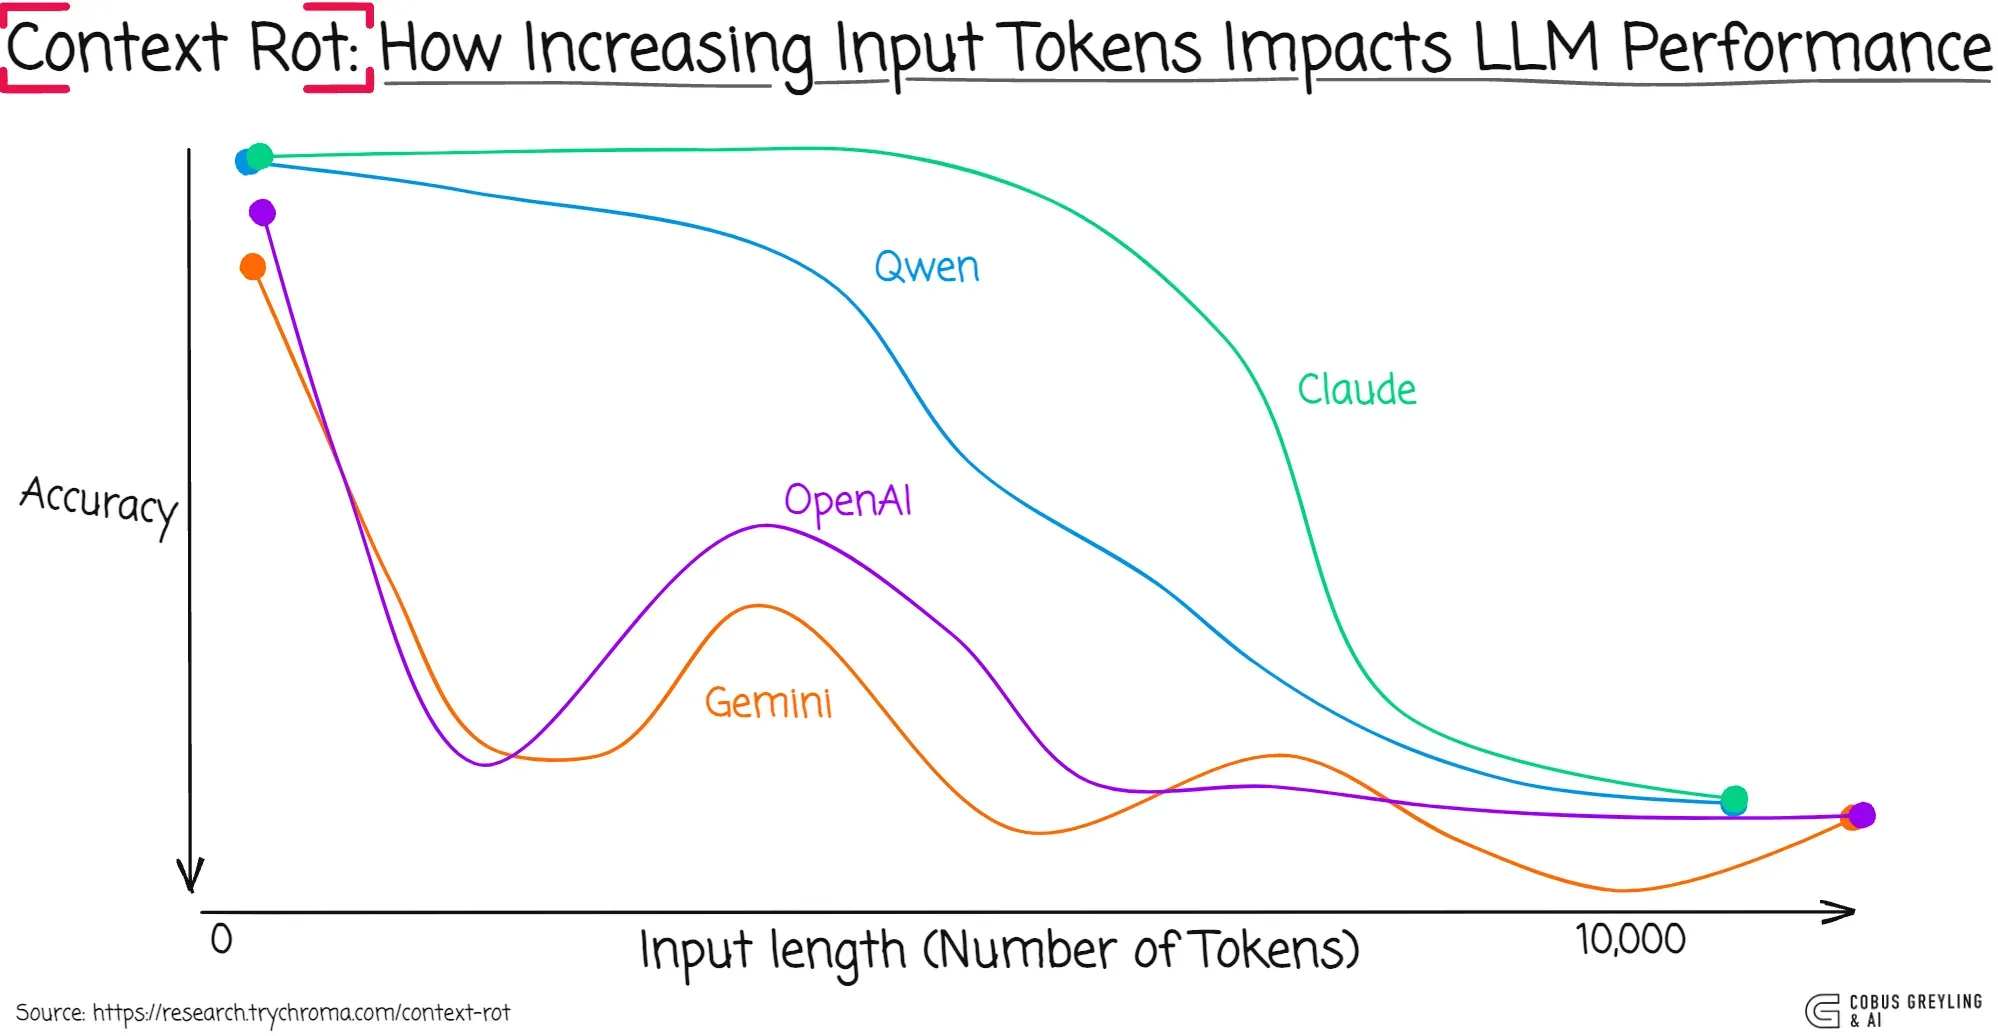
I recommend reading an article about “context rot”, it explains this problem very well.
Based on that, we can also conclude that we should not hesitate to start a new conversation or use /clear to reset the context window.
With the /context command, you can track the current context window in detail. As you can see in the screenshot, right from the start our context is already taken up by CLAUDE.md, the system prompt, system tools, the current conversation history (Messages), and so on. It is also interesting to note that the Autocompact buffer already consumes 45k tokens by default, so that if the context window overflows there is room for the summary. As a result, only about 133k tokens of the context window are actually available from the beginning of the conversation.

Subagents
A subagent is a specialized Claude instance that runs a focused subtask in its own context window, with its own system prompt, tool allow/deny list, permission mode, and even model choice. Claude delegates work to it when your request matches the subagent’s description, then the subagent returns a summary back to the main conversation.
That’s useful because it lets you deliberately separate work that is:
- Token/verbosity-heavy (tests, logs, big greps, doc scraping), keep the noisy details out of your main thread.
- Risky (shell commands, edits), you can hard-limit tools and permissions so the agent can’t “helpfully” do damage.
- Specialized (security review, perf audit, SQL validation), you can give one domain-specific instructions without polluting your everyday prompt.
- Cost-sensitive, route certain tasks to faster/cheaper models like Haiku.
One important detail: a subagent does not receive the full Claude Code system prompt, it only gets its system prompt (plus basic environment details like working directory). That’s a big part of why they stay “clean” and focused.
Using the /agents command, we can create agents at the user level or at the project level. If you already have a CLAUDE.md loaded into memory, that context will be used when creating the agent. After creation, the agent appears as a .md file inside the .claude folder, either the personal one or the project one, depending on what you choose.
Good examples of such agents are test-runner.md and code-reviewer.md. For instance, by creating a code-reviewer.md agent, we can delegate code review without cluttering our main context window, and we can configure read-only permissions. After all, we only want a code review, not fixes or code changes.
We can invoke agents directly in our prompt by referencing them by name. You can also use multiple agents in chain at the same time. For example, you might write a prompt like this:
Use test-runner-al first. If compilation fails, summarize errors.
Then use code-reviewer-al to review the impacted objects and suggest minimal fixes.
Custom slash commands aka Skills
Slash commands or Skills in Claude Code are reusable prompts stored as Markdown files that you run by typing /command-name. They support project vs personal scope, arguments, bash pre-execution, file references, and frontmatter to control behavior. They are placed under .claude/commands or .claude/skills/. They are calling same as standard built-in commands. I recommend reading about slash commands in the documentation.
The description and name of each Skill are automatically loaded into context with every request to the agent. Therefore, Claude Code can proactively use Skill based on the context of the request.
Here we will look at a fairly simple, but still useful, example of a custom slash command. Very often, after working on a git branch, we need to describe what was changed for a pull request. That is why a new /al-status command can be useful to compare the current working tree changes against HEAD and generate a description for the future PR. It is also simply a convenient way to review what was done and what deserves attention. Just create an al-status.md file in .claude/commands with the following content:
---
description: Summarize current AL work: what changed, likely impacted objects, and next steps (compile/test/review). Great before committing.
argument-hint: (no args)
allowed-tools: Bash(git status:*), Bash(git diff:*)
context: fork
agent: general-purpose
---

## Auto context
- Status: !`git status`
- Changed files: !`git diff --name-only`
- Diff summary: !`git diff --stat`
- Name/status: !`git diff --name-status`

## Repo rules (hard constraints)
@CLAUDE.md

## Task
Create a short, PR-ready summary:
1) What changed (bullets)
2) Risk areas to double-check (filters/keys, SetLoadFields, COMMIT/locking, events, labels, tests)
3) Next steps checklist (compile app, compile test, run tests if possible)
Keep it concise.
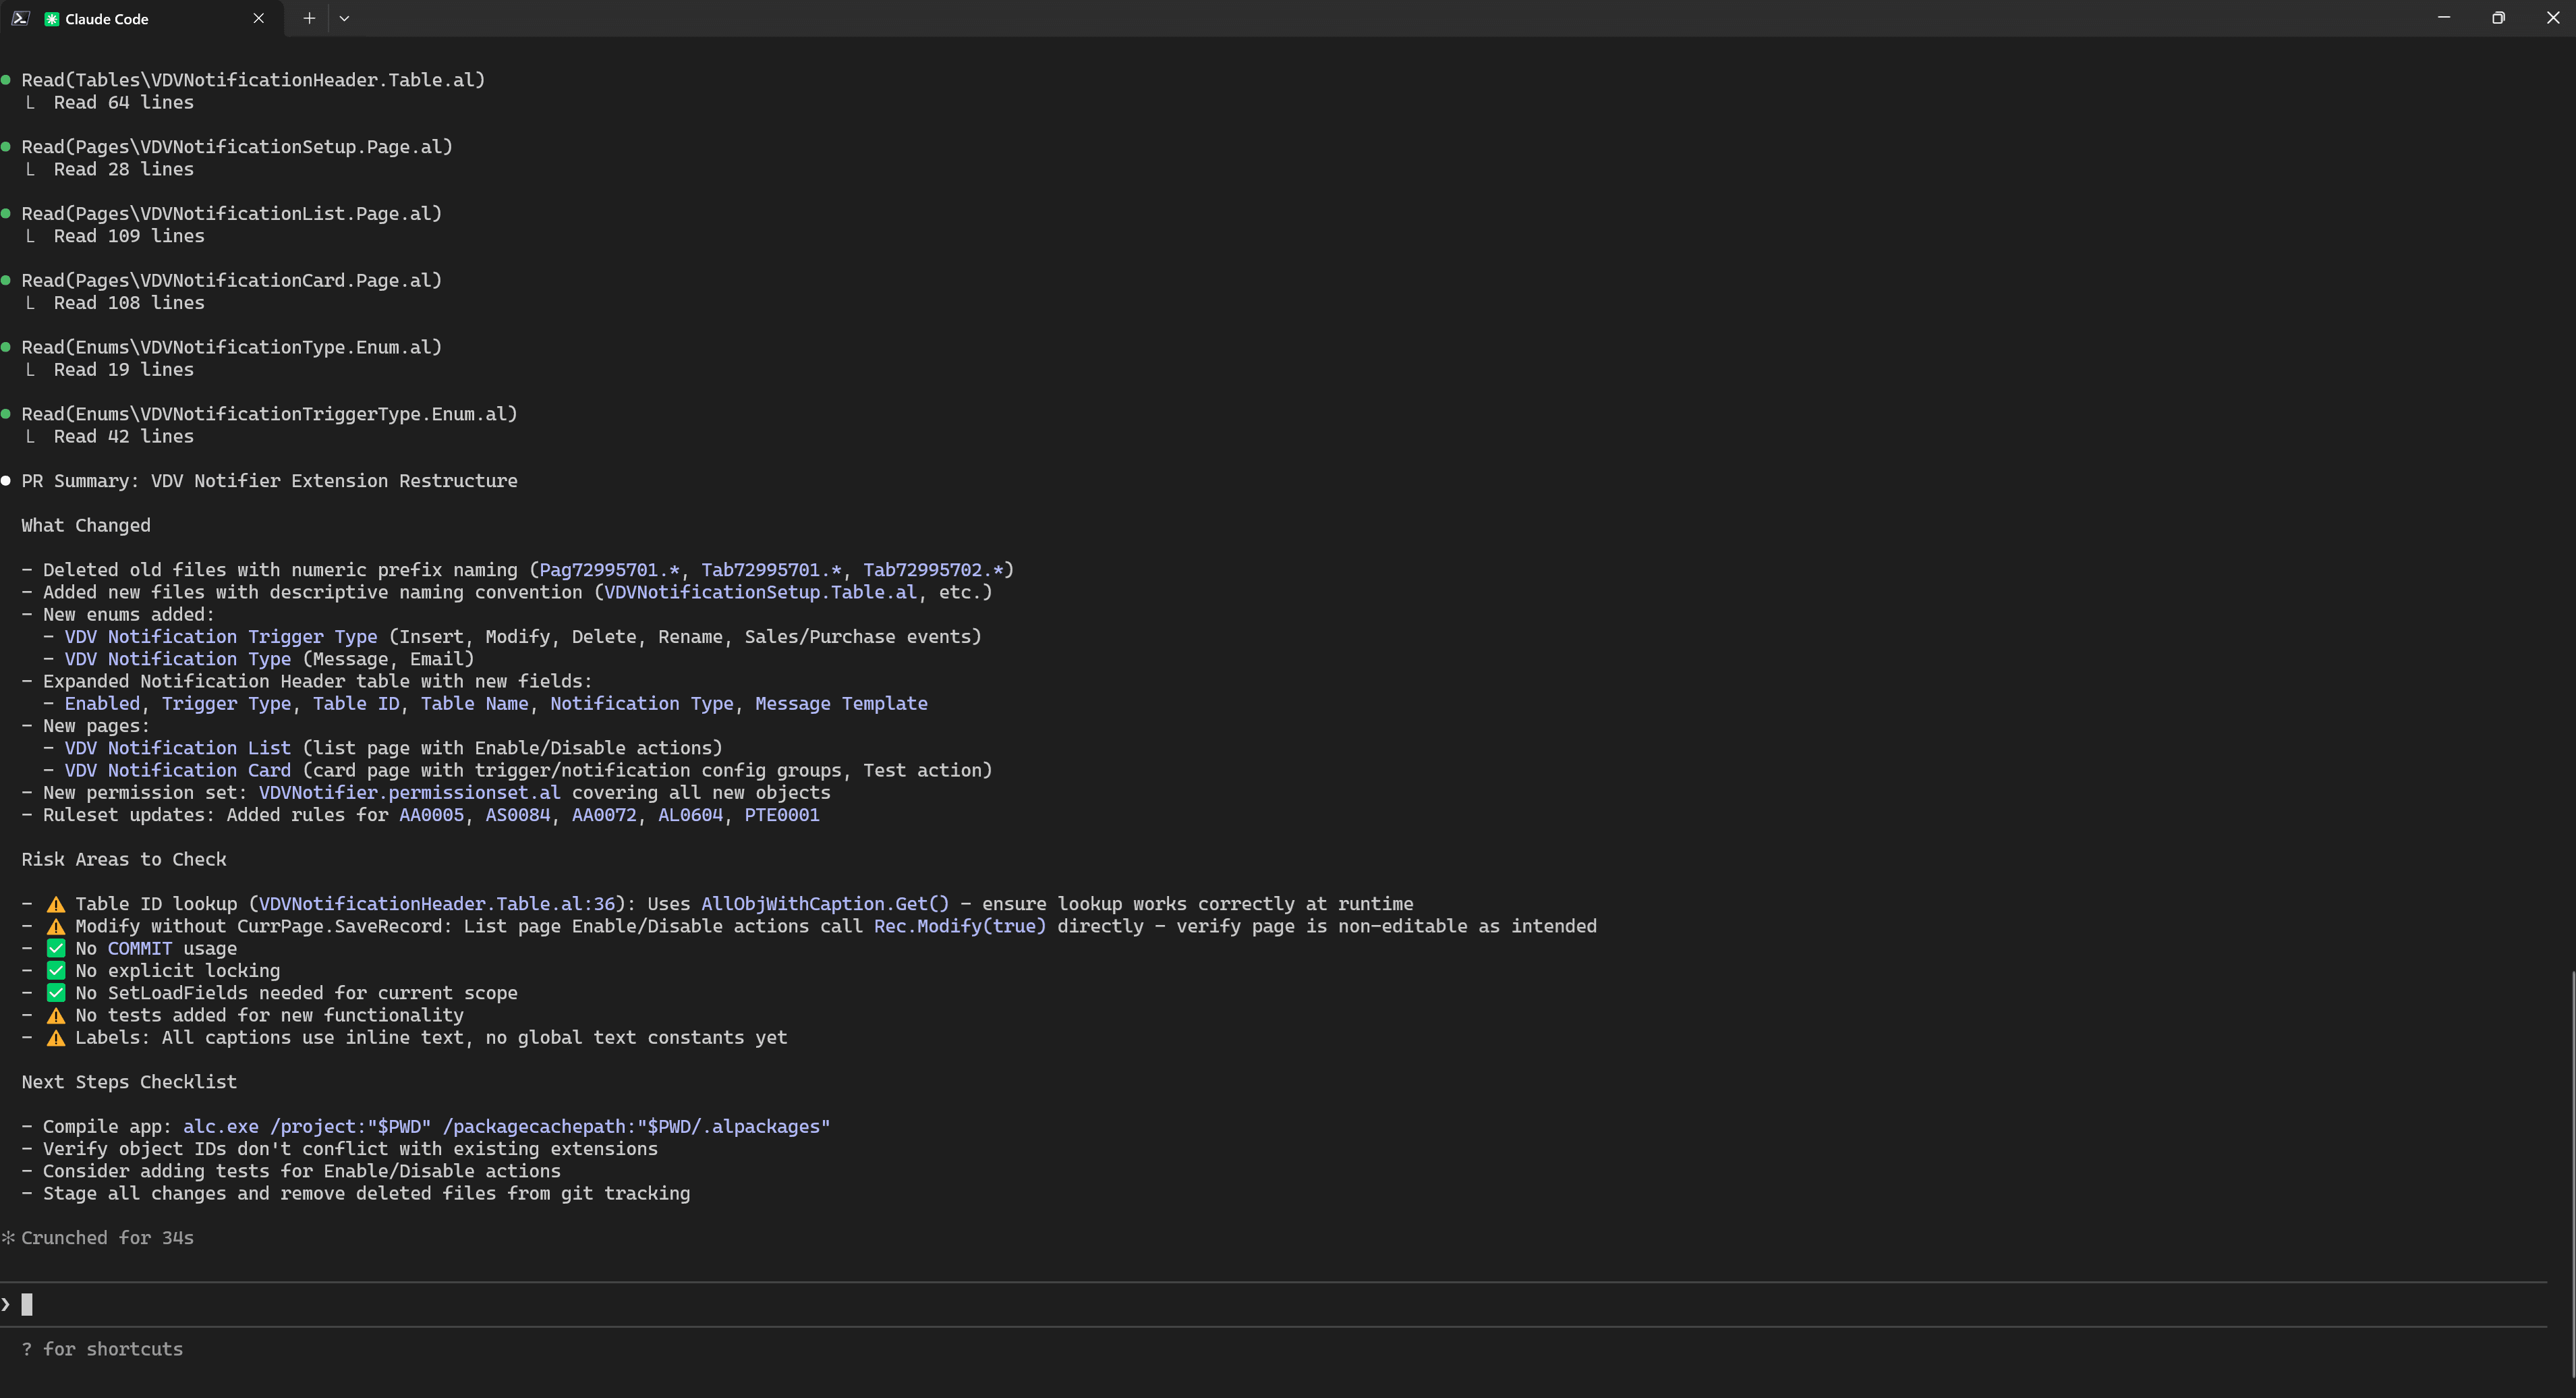
Result of execution /al-status in Claude Code for my project:
MCP
MCP has a huge impact on how well agents perform. This feedback loop between the agent and the outside world is a real game changer. I briefly mentioned MCP in my previous blog post, and now I would like to move on to the practical side of using it.
I have already mentioned the Business Central MCP, which allows you to work with various API pages. Today, however, I want to use a different example and talk about the very popular Playwright MCP.
Playwright MCP allows an LLM to perform many actions in a browser. For Business Central development and testing work, this can become a very useful tool. Let's move on to installing and configuring the Playwright MCP on project level. For this, we can use the following command:
claude mcp add --transport stdio playwright -- npx -y @playwright/mcp@latest
After that, we can check whether this MCP server is available using the /mcp command:

Next, we can simply instruct the agent to do something using the Playwright MCP directly in the prompt. For demonstration purposes, I asked Claude Code to open Business Central, find a page, and describe which buttons are visible, all through MCP. Here is my prompt:
Use playwright mcp to open Business Central URL
  http://bc273us/BC/?company=CRONUS%20USA%2C%20Inc.&tenant=default
  for login you can use login VLD and password Qwerty123! After search for page "VDV Notifications"
  and let me know what actions are available in action pane
As a result, the LLM used MCP to perform all the necessary actions and then reported the outcome back to me. In other words, you can automatically validate results and perform actions, everything is limited only by your set of MCPs and your imagination.

Multi-Claude Workflows
One of the undeniable advantages of LLM agents is the ability to run multiple agents in parallel. To do that, you can simply launch several Claude Code sessions at the same time. However, in this case the agents may conflict if they modify the same file. So what can you do?
Git worktrees let you have multiple working directories linked to the same repository. Each directory can have a different branch checked out, but they all share one .git folder. This means you get full isolation between workspaces without duplicating your entire repo, just the files you actually need to work with.
Create worktrees for your features:
# Navigate to your project
cd /path/to/your-project

# Create worktree for feature A
git worktree add ../your-project-feature-a -b feature-a

# Create worktree for feature B
git worktree add ../your-project-feature-b -b feature-b

# Or use existing branch
git worktree add ../your-project-bugfix bugfix-123
Open separate terminals for each worktree:
# Terminal 1
cd ../your-project-feature-a
claude

# Terminal 2
cd ../your-project-feature-b
claude
Manage and clean up:
# List all worktrees
git worktree list

# Remove worktree when done
git worktree remove ../your-project-feature-a

# Clean up stale worktree metadata
git worktree prune
Summary
For developers, Claude Code offers a practical way to speed up development, but only if configured properly. A good CLAUDE.md with your repo structure, build commands, and AL best practices is the foundation. Permission modes give you control over how autonomous the agent can be. Context management keeps conversations focused and prevents quality degradation. Subagents let you isolate tasks like code review or test running. Custom slash commands like /al-status automate your PR workflow. And MCP opens up possibilities like browser automation with Playwright. Start with CLAUDE.md, experiment with the rest, and build from there.