'%3e%3cpath%20fill='%23C0E1E2'%20d='M7%200H4v20h3V0Z'%20/%3e%3cpath%20fill='%23C0E1E2'%20d='M16%2010h-3v10h3V10Z'%20/%3e%3cpath%20fill='%23C0E1E2'%20d='M0%2013v3h20v-3H0Z'%20/%3e%3cpath%20fill='%23C0E1E2'%20d='M0%204v3h10V4H0Z'%20/%3e%3cpath%20fill='%2360B2B6'%20d='M19.996%204v3H13V0h3v4h3.996Z'%20/%3e%3c/g%3e%3cdefs%3e%3cclipPath%20id='clip0_1029_1800'%3e%3cpath%20fill='%23fff'%20d='M0%200h20v20H0z'%20/%3e%3c/clipPath%3e%3c/defs%3e%3c/svg%3e) Data Editor
Data Editor  Subscribe
CLI Agents Part 3: Business Central MCP Server
In the previous posts in the CLI Agents series, we discussed the evolution of AI tools, the advantages of CLI agents, and the basic best practices for Claude, how to manage the context window properly, what MCP is, why subagents matter, and so on. Today, I propose that we look at how to configure and use the Business Central MCP server through Claude Code. We will also talk about possible usage scenarios.
- CLI Agents: The New Standard of AI Coding
- CLI Agents Part 2: Claude Code Best Practices
- CLI Agents Part 3: Business Central MCP Server
- CLI Agents Part 4: Practical Use
Agenda
Introduction
Very recently, Microsoft released the Business Central MCP Server in preview. As is known, MCP is the open-source Model Context Protocol that standardizes how AI interacts with a wide range of external services. The BC MCP Server, in turn, makes it possible to interact with Business Central through API pages.
That means we have access to the full power of Business Central API pages, specifically read, create, modify, delete, and even OData bound actions.
I will also share a very useful diagram to help understand how AI agents interact with Business Central. You can notice two main communication gateways.
- Business Central Connector - a simplified low-code connector in the Power Platform. In general, this is not what we will discuss today.
- Business Central MCP Server - MCP-based connectivity through API pages. This is suitable for advanced scenarios and flexible configuration, and it is exactly what we are focusing on.

At the moment, the easiest way to use the BC MCP Server is through Copilot Studio, but it can also be used via a proxy from any other client. We will focus on using it in Claude Code.
I will also use the code from the BCTech Samples repository.
I also recommend watching a three-part video series about the Business Central MCP Server from Microsoft:
Important: The Business Central MCP Server configuration is currently in preview and may change in the future.
BC MCP Configuration
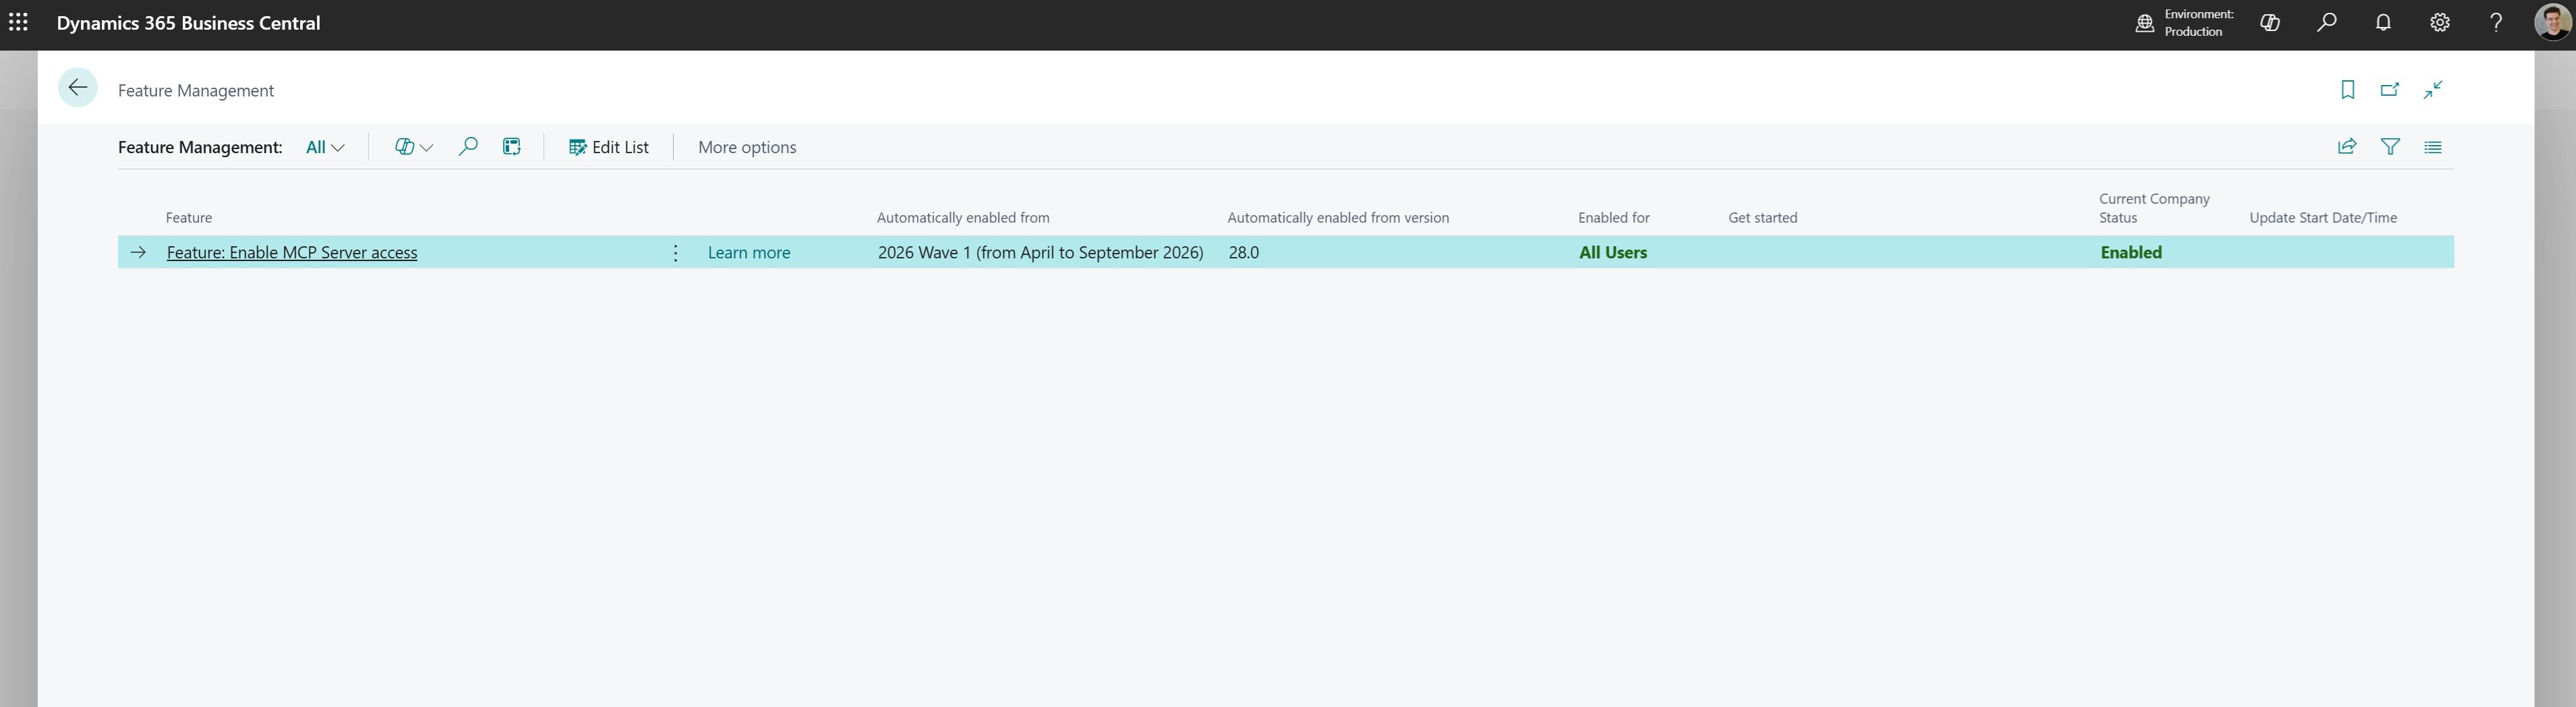
First, to enable the MCP Server on your environment, go to the Feature Management page and turn on Feature: Enable MCP Server access. This will allow you to use the BC MCP Server in Copilot Studio or from any other client through a proxy.
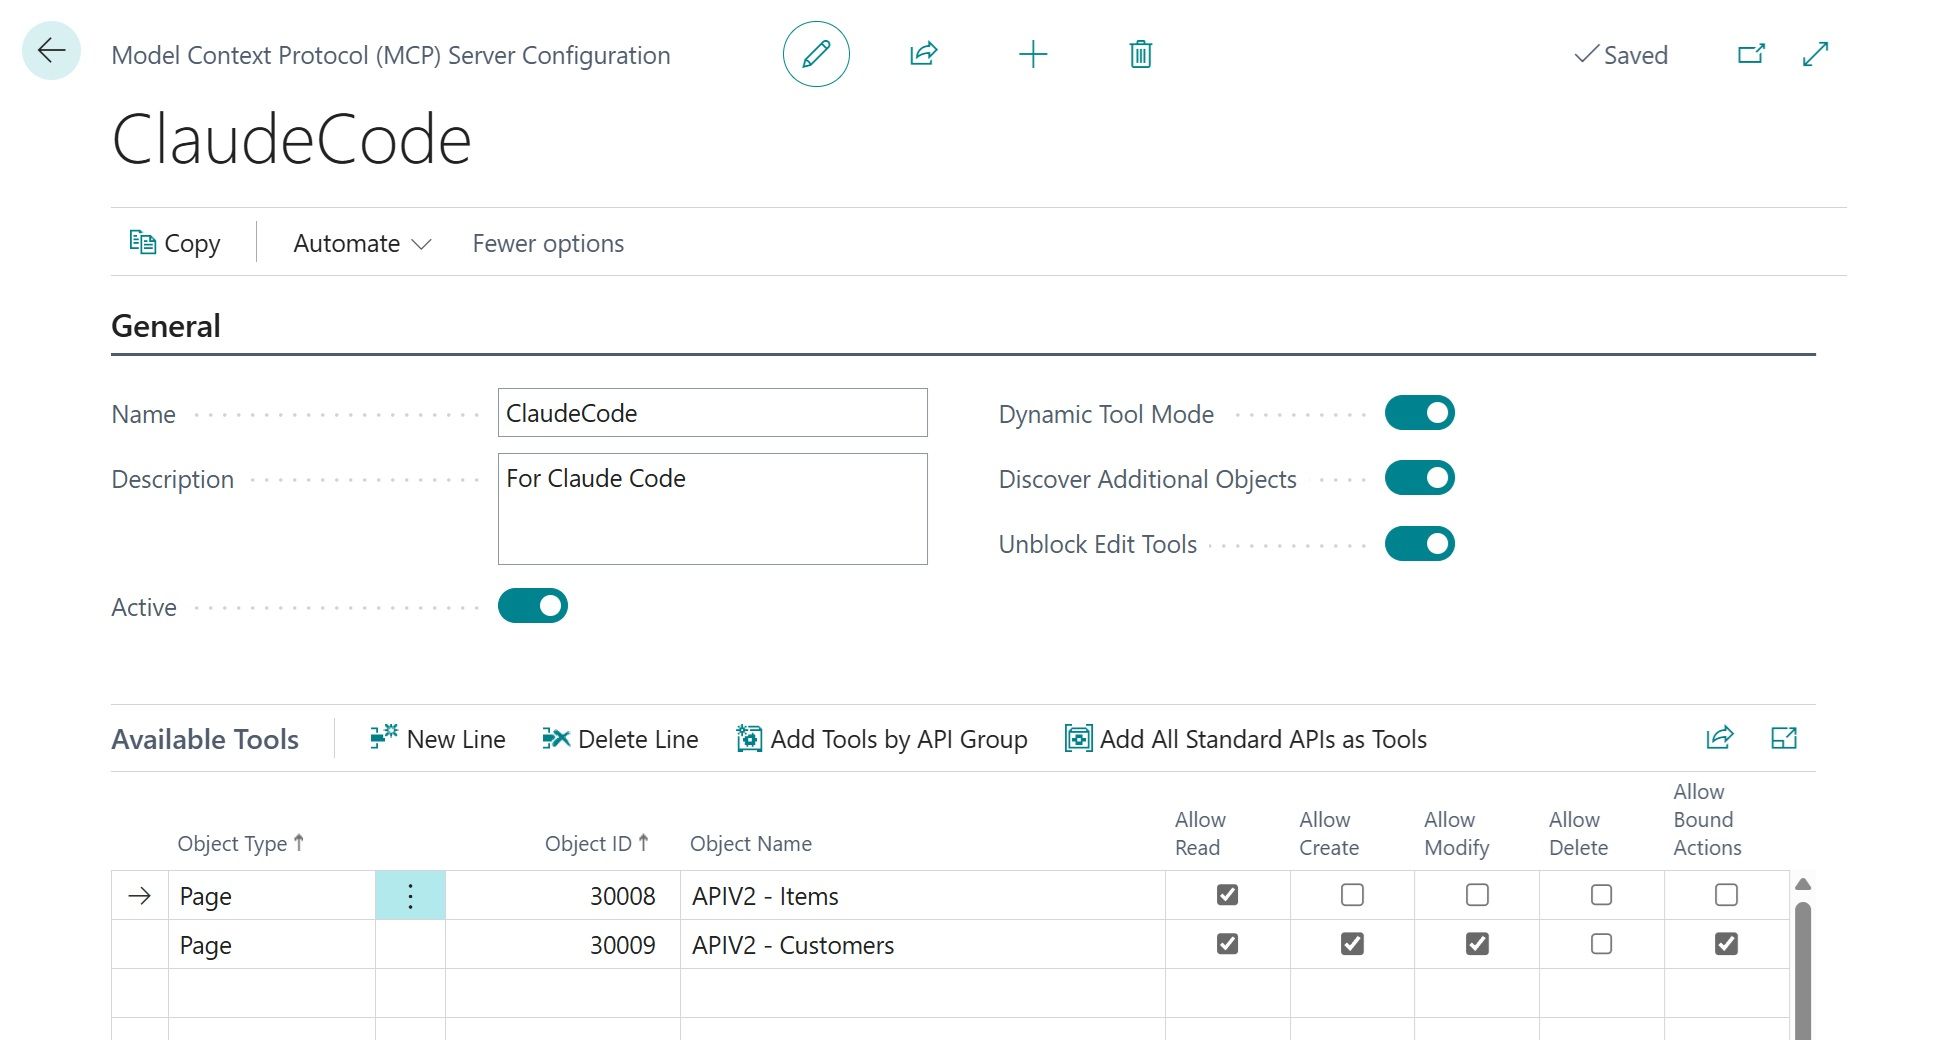
Next, we can go to the Model Context Protocol (MCP) Server Configuration page and create a configuration for the BC MCP Server. This is essentially where we control what permissions and access an AI client will have in relation to our Business Central environment through the MCP Server.
You can learn more about the fields on this page in the official documentation, in short:
Dynamic Tool Mode controls how MCP uses tools. Essentially, there are standard tools such as bc_actions_search, bc_actions_describe, and bc_actions_invoke. They can dynamically discover API pages, understand their purpose, and use bound actions. If Discover Additional Objects is enabled, this provides access to all API pages. Each individual API page is treated as a tool, but AI agents tend to perform worse when there are too many tools. In addition, some agents have limits on the number of tools, for example, Copilot Studio supports a maximum of 70 tools.
Discover Additional Objects works only when Dynamic Tool Mode is enabled. When set to true, you can additionally specify particular API pages to improve the agent’s context if you know which ones will be used most often, but the agent will still have access to all API pages. When set to false, it allows you to restrict permissions for specific API pages, for example, making some pages read-only access.
Unblock Edit Tools simply provides a convenient way to control whether API pages are allowed to use write permissions or are restricted to read-only access. Just one flag for all API pages selected on lines.
In my example, you can see that I have read-only Item API and write Customer API without delete.
You can also skip creating a configuration, in that case the default configuration will be used. The default configuration provides read-only access to all API pages, meaning Dynamic Tool Mode = true and Discover Additional Objects = true.
Of course, I strongly recommend not using write permissions in Production.
Azure App Registration
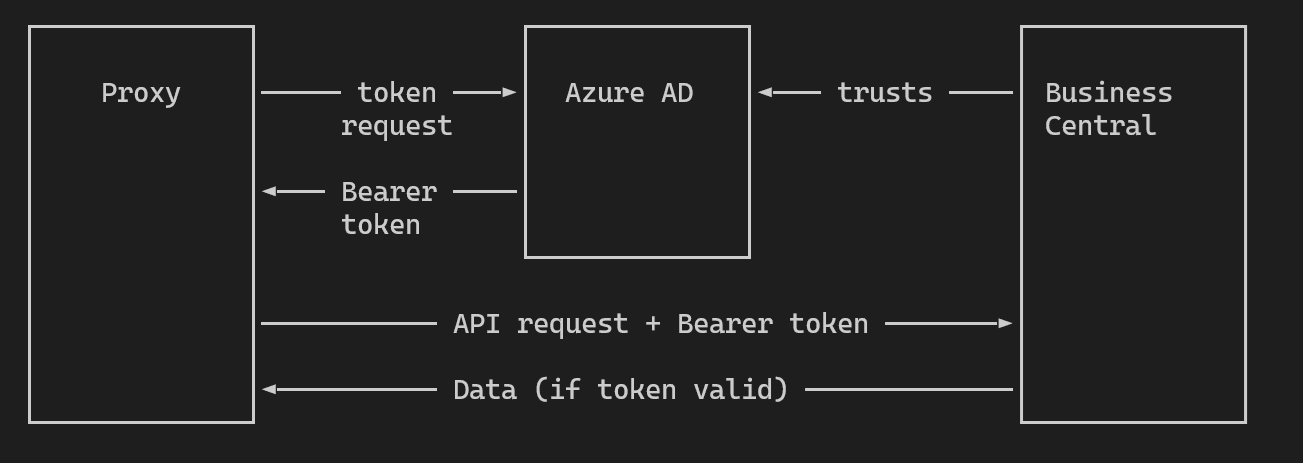
The next step is to create an app registration in Azure. We need it to set up Azure AD authentication between Business Central and the proxy. Here is a small diagram showing how this works:
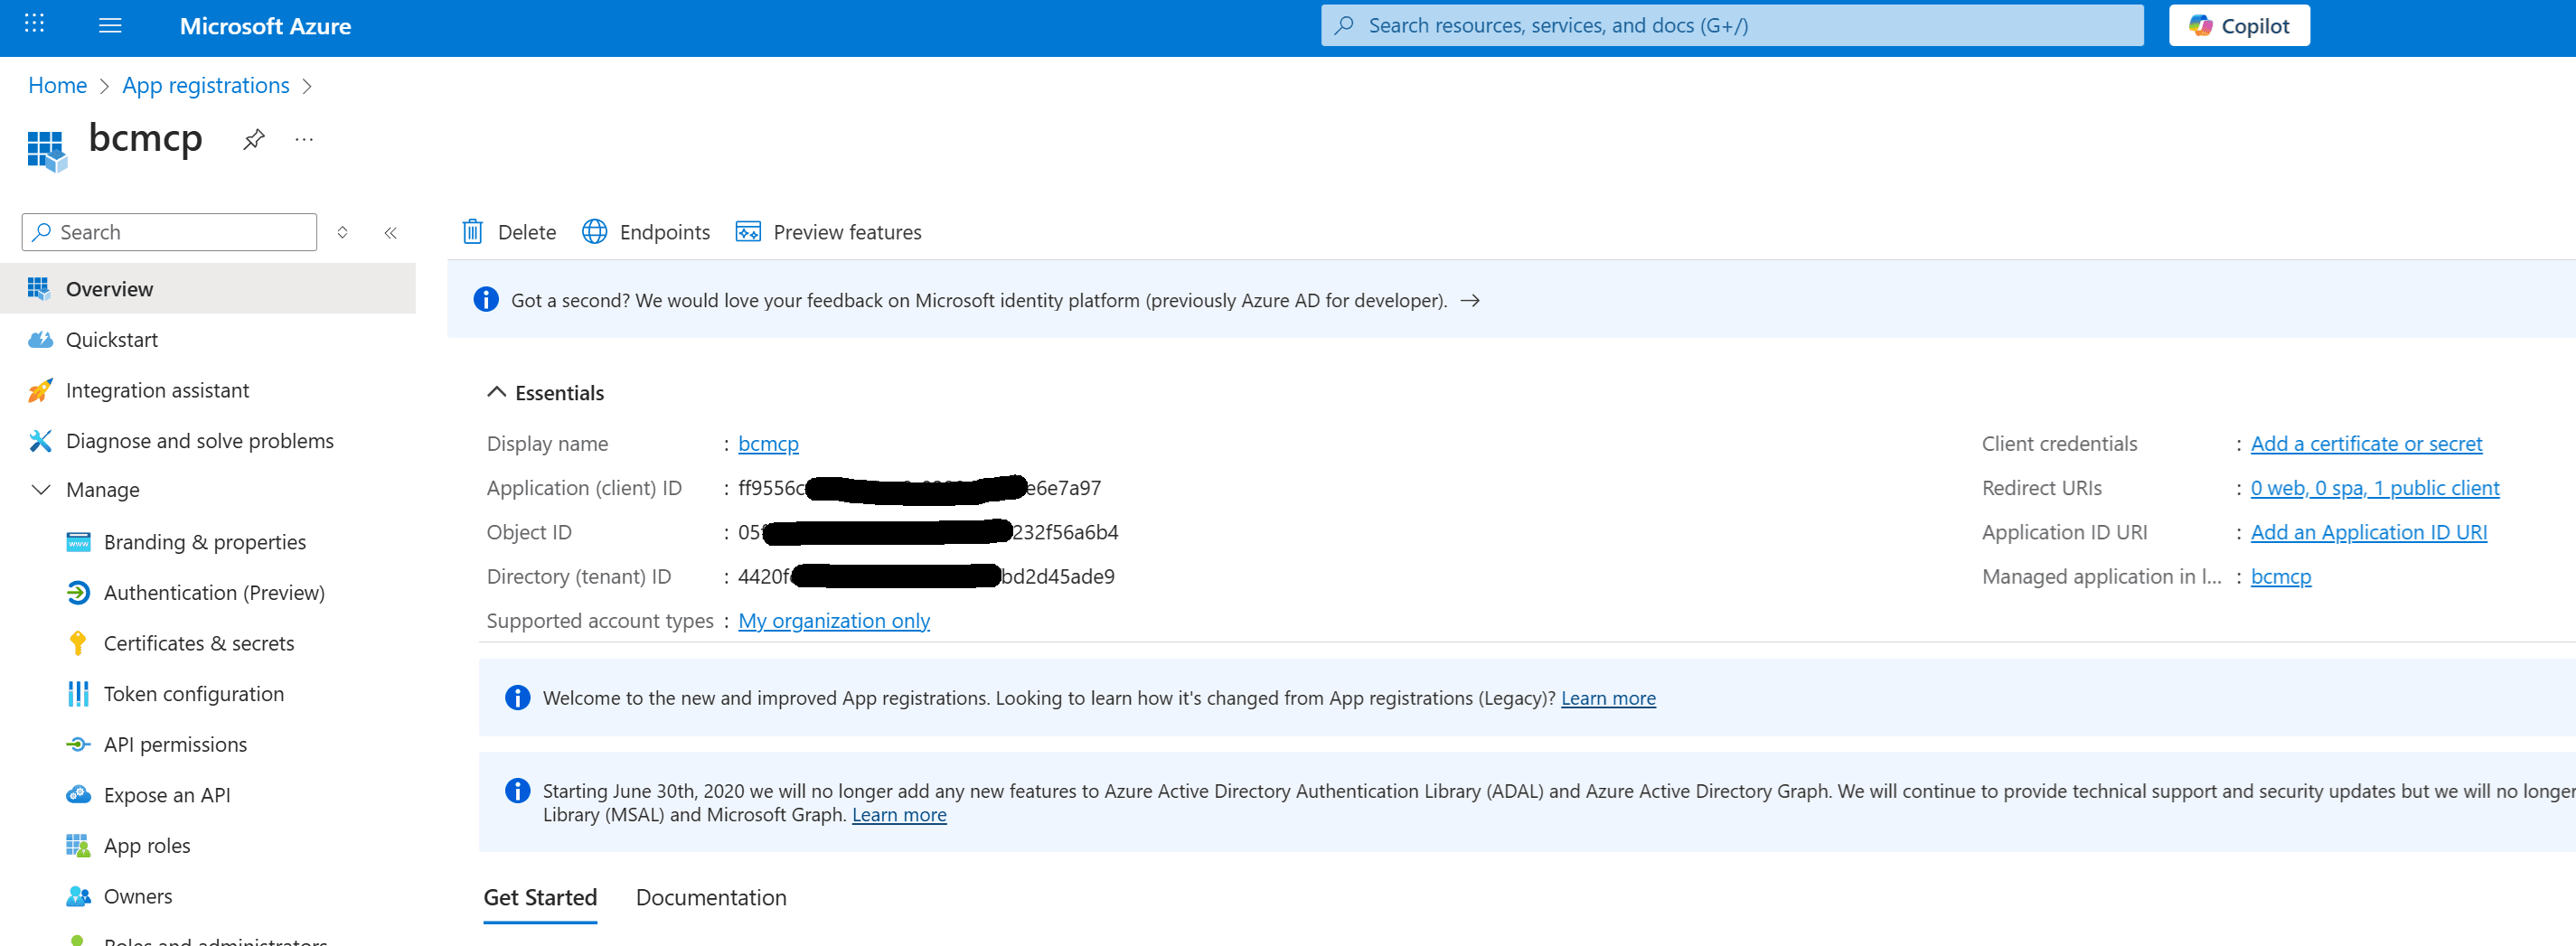
Create a new app registration.
Go to the Authentication tab and add a desktop redirect URL in the following format:
ms-appx-web://Microsoft.AAD.BrokerPlugin/{ClientIdOfCurrAppRegistration}
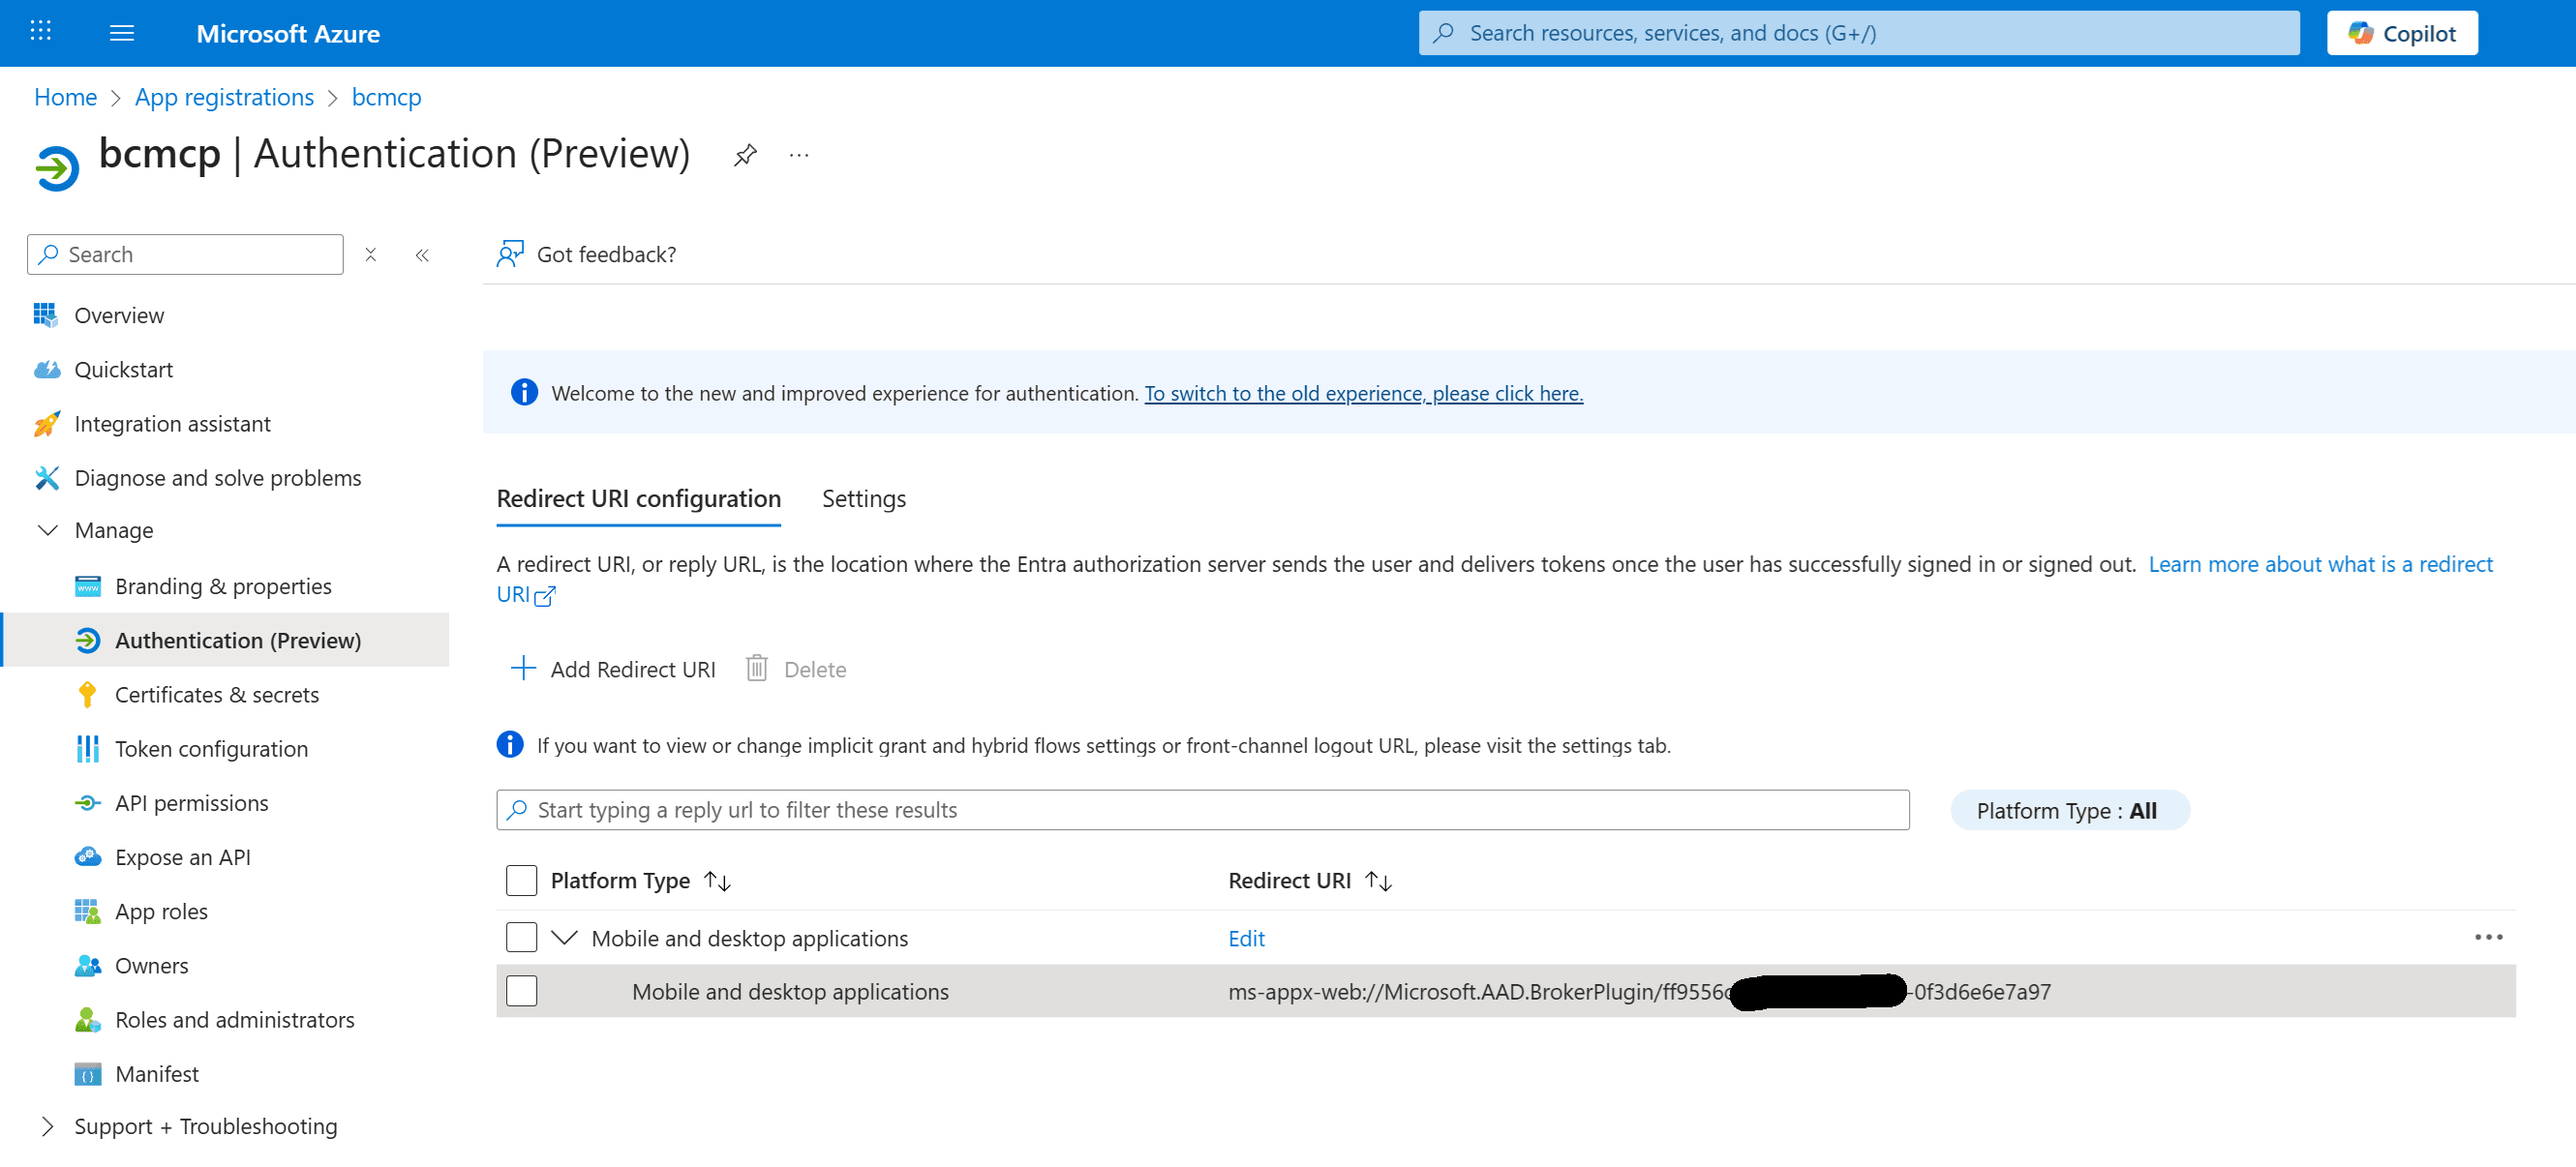
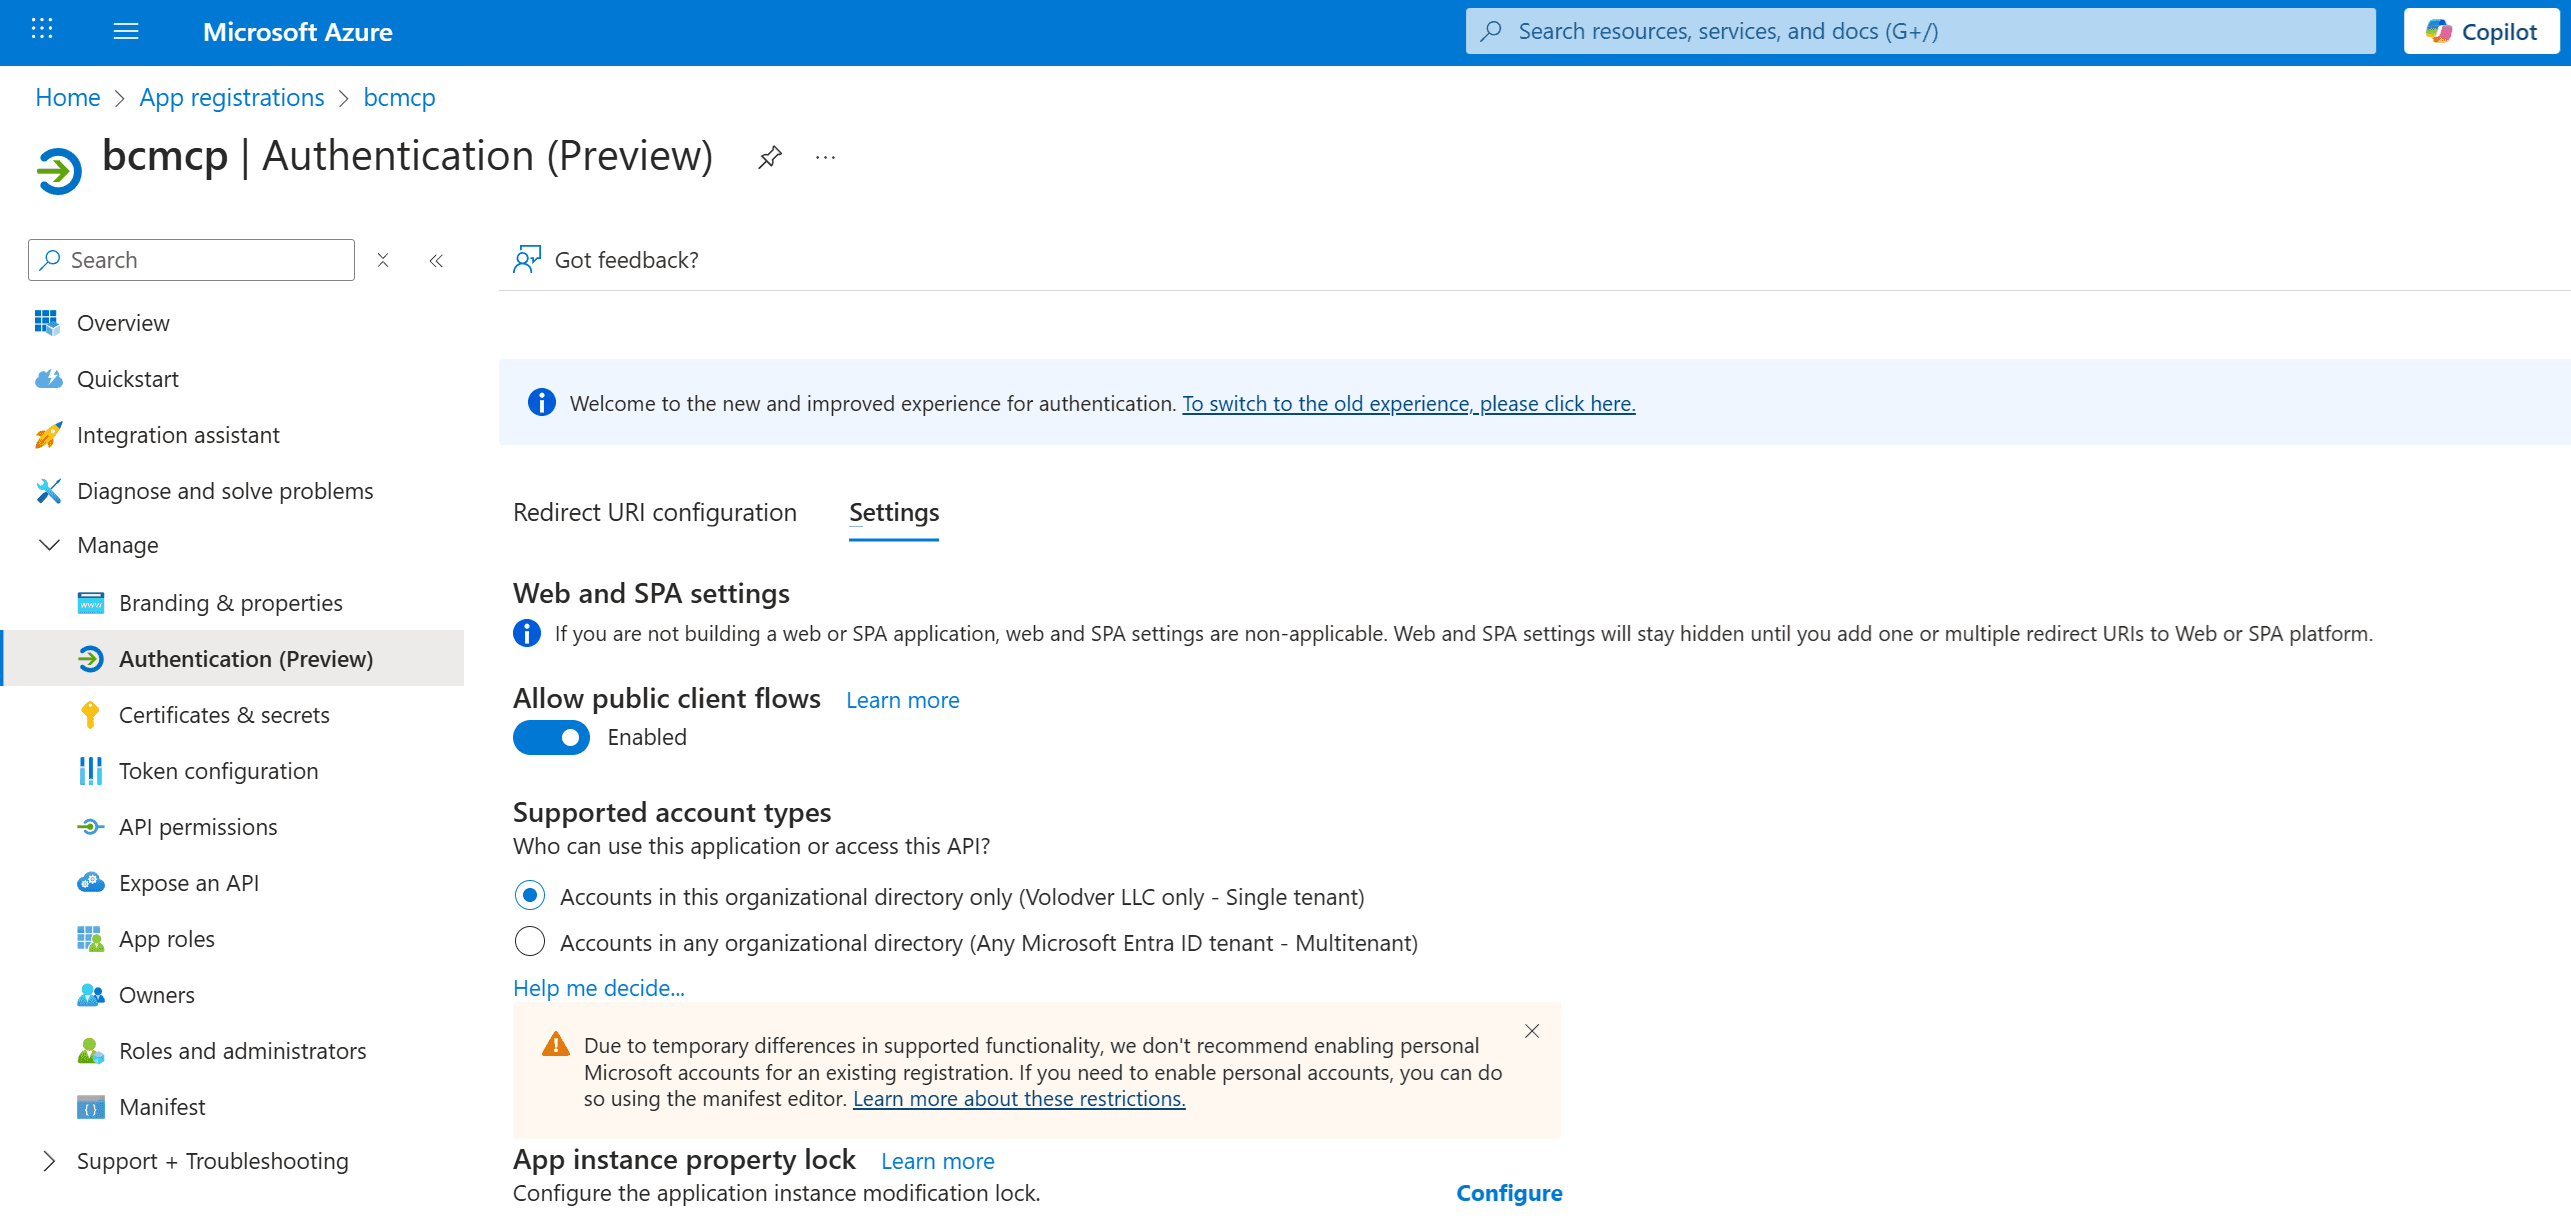
Also, do not forget to enable Allow public client flows in the settings.
Go to the API permissions tab and add Financials.ReadWrite.All and user_impersonation.
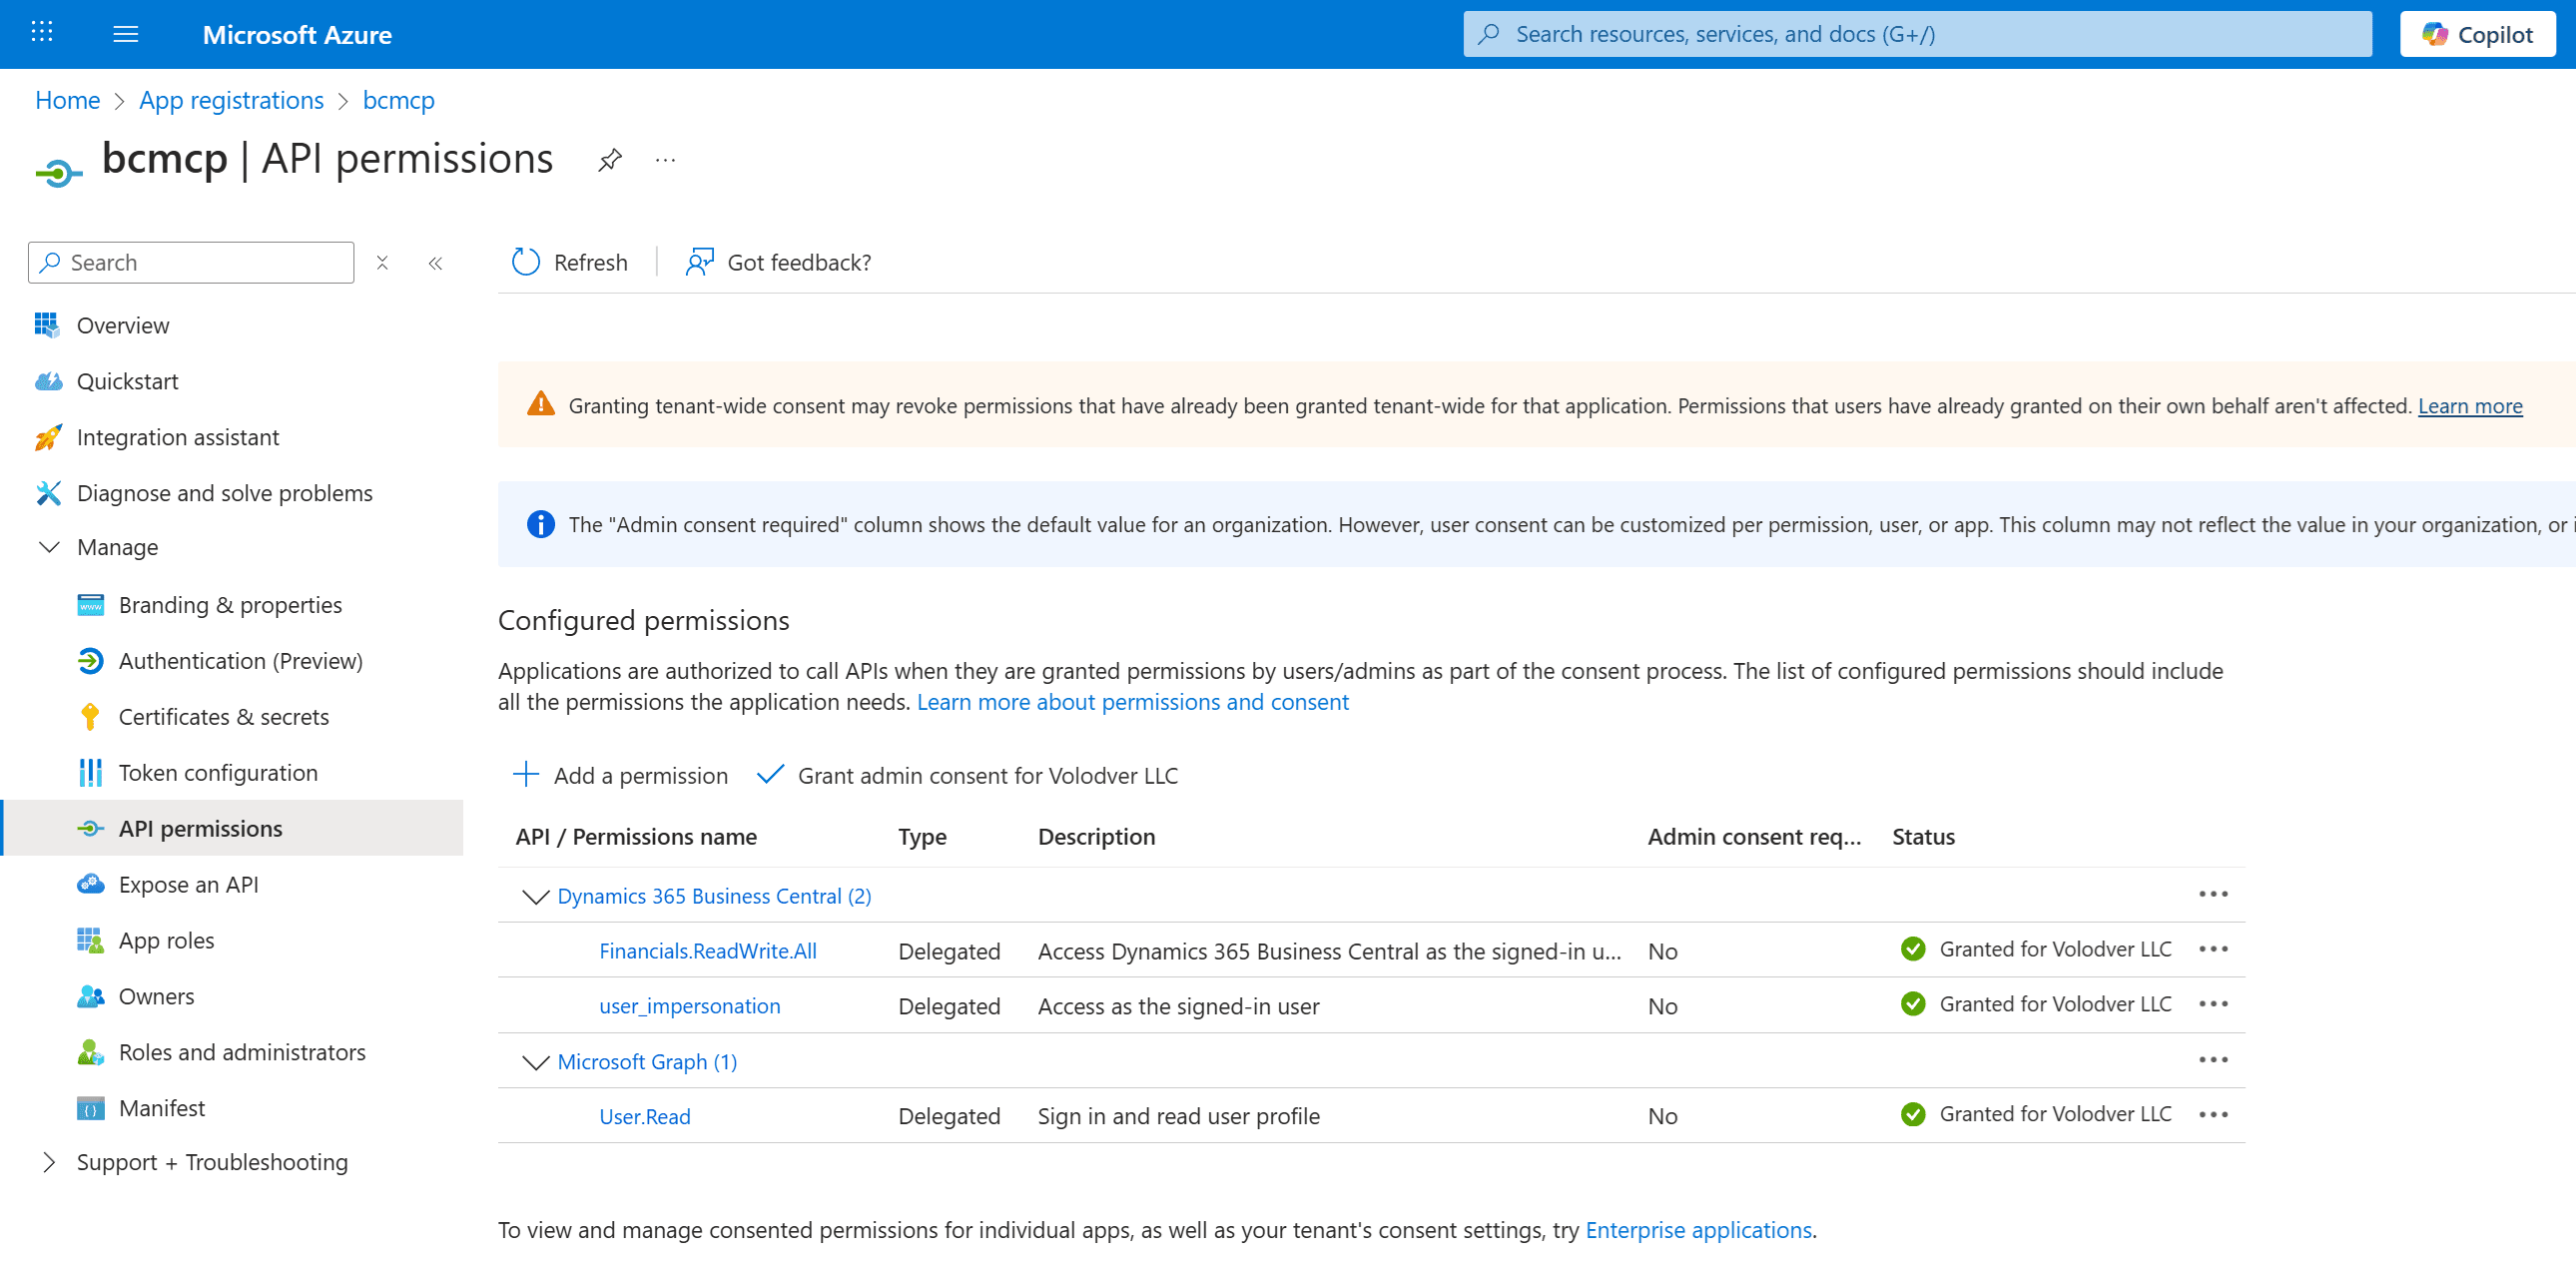
These settings will be sufficient to proceed to the next step.
BC MCP Proxy on Python
Next, we need a proxy server that connects Claude Code to Business Central via MCP. The BCTech Samples repository contains two examples of such servers:
I recommend using BcMCPProxyPython, because it is much easier to work with. It is essentially a convenient wizard for generating the MCP JSON configuration and setting up a local Python proxy.
Install the BC MCP Proxy using the pip package manager:
pip install bc-mcp-proxy
Next, run the wizard that we just installed:
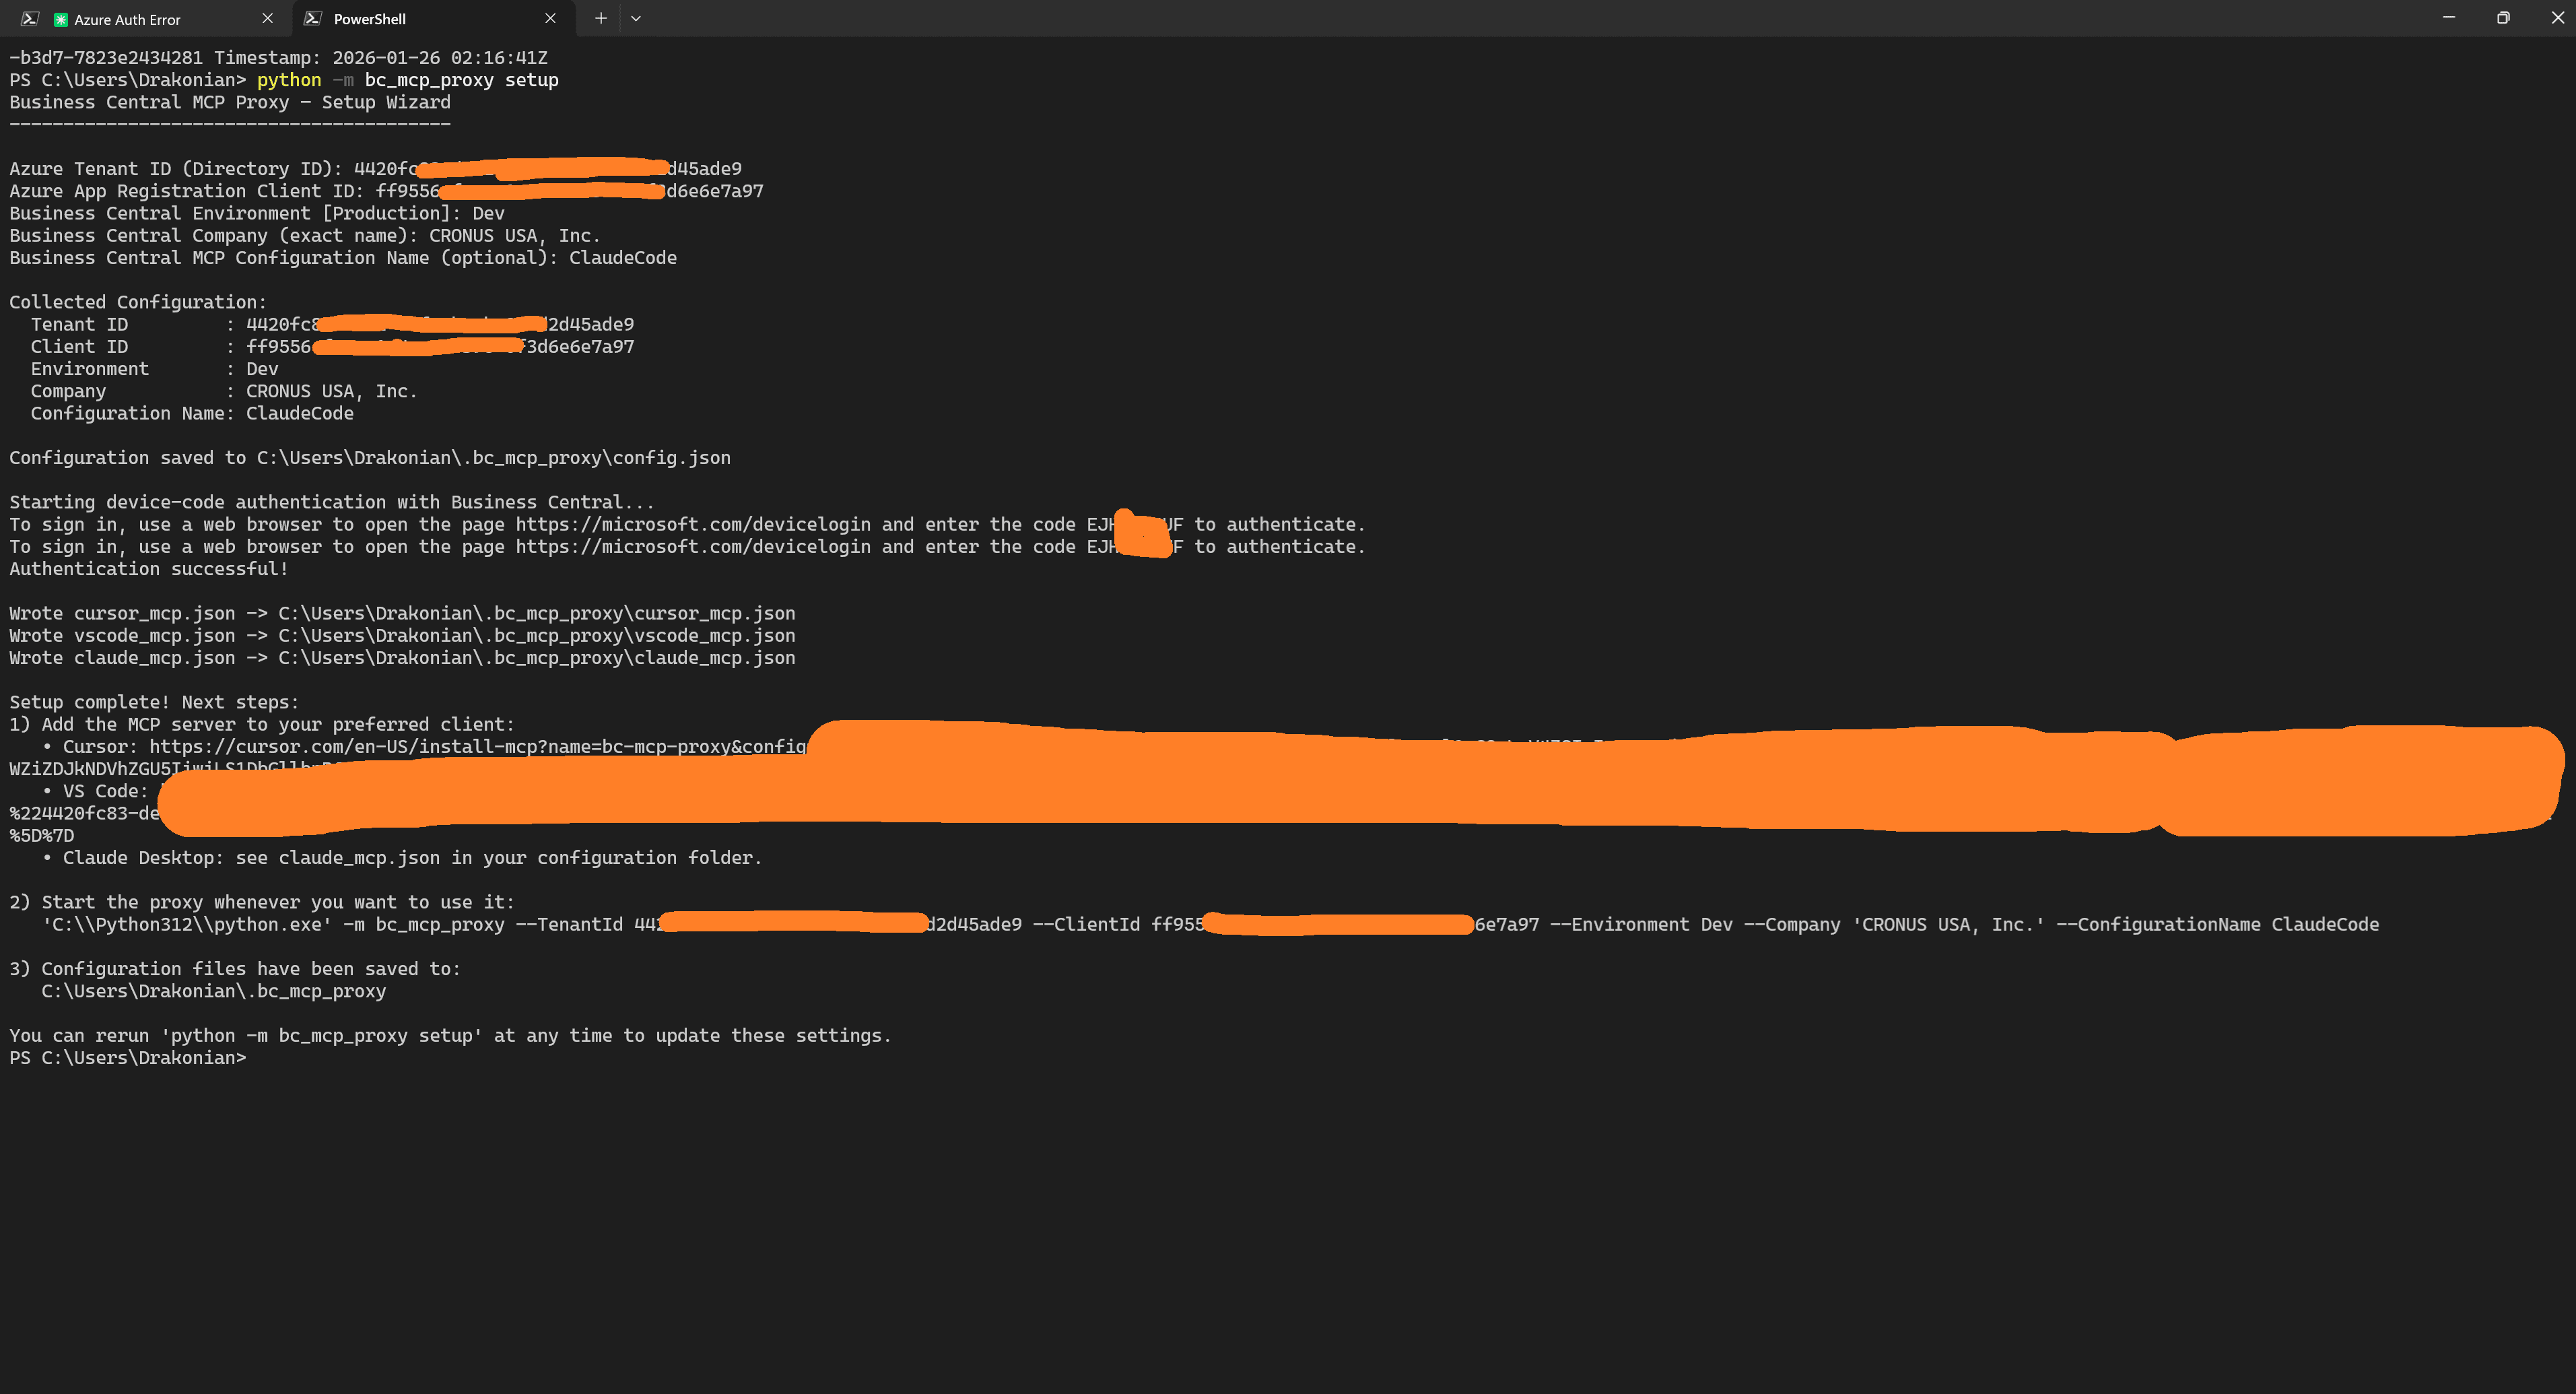
python -m bc_mcp_proxy setup
Next, follow the wizard prompts and provide: TenantId, ClientId, Environment, Company Name, and optionally the MCP Configuration name. If you do not specify an MCP configuration, then, as I mentioned earlier, the default read-only configuration will be used. In my example, I use the configuration I created earlier named ClaudeCode.
In the final step, an Azure sign-in prompt will appear, and you need to use an account from the same Azure tenant where you created the app registration.
As a result, we will be able to run the Python proxy server locally and we will get an MCP configuration in JSON format that we can use with Claude Code.
Here is an example command to start the BC MCP Proxy server:
& "C:\Python312\python.exe" -m bc_mcp_proxy --TenantId {TenantId} --ClientId {ClientId} --Environment Dev --Company "CRONUS USA, Inc." --ConfigurationName ClaudeCode
In my example, all configuration files are located in the following folder:
C:\Users\Drakonian\.bc_mcp_proxy
Our goal is to take the claude_mcp.json file and add it to the project-level MCP Servers configuration or to the global configuration for Claude Code.
You can do this either by running:
claude mcp add {YourBCMCPName} '{EscapedJSON}'
or by manually adding this configuration to the .claude.json file.
In the end, you can verify access to this MCP using:
claude mcp get {YourBCMCPName}
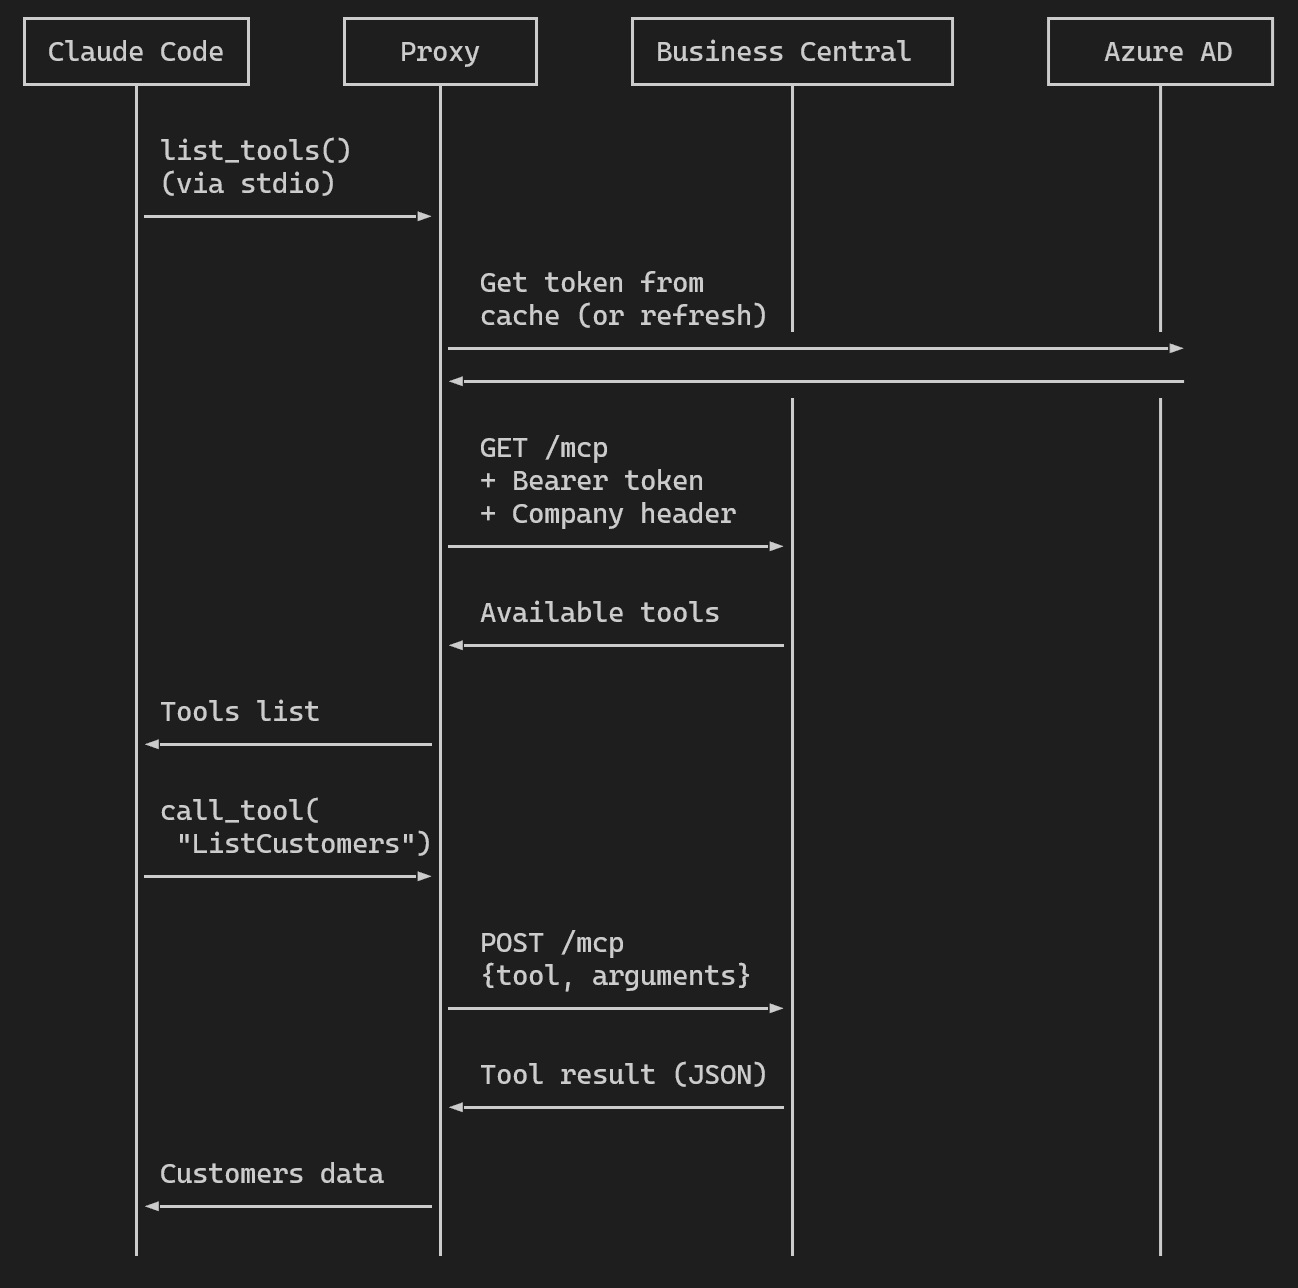
At the end high-level request diagram will be:
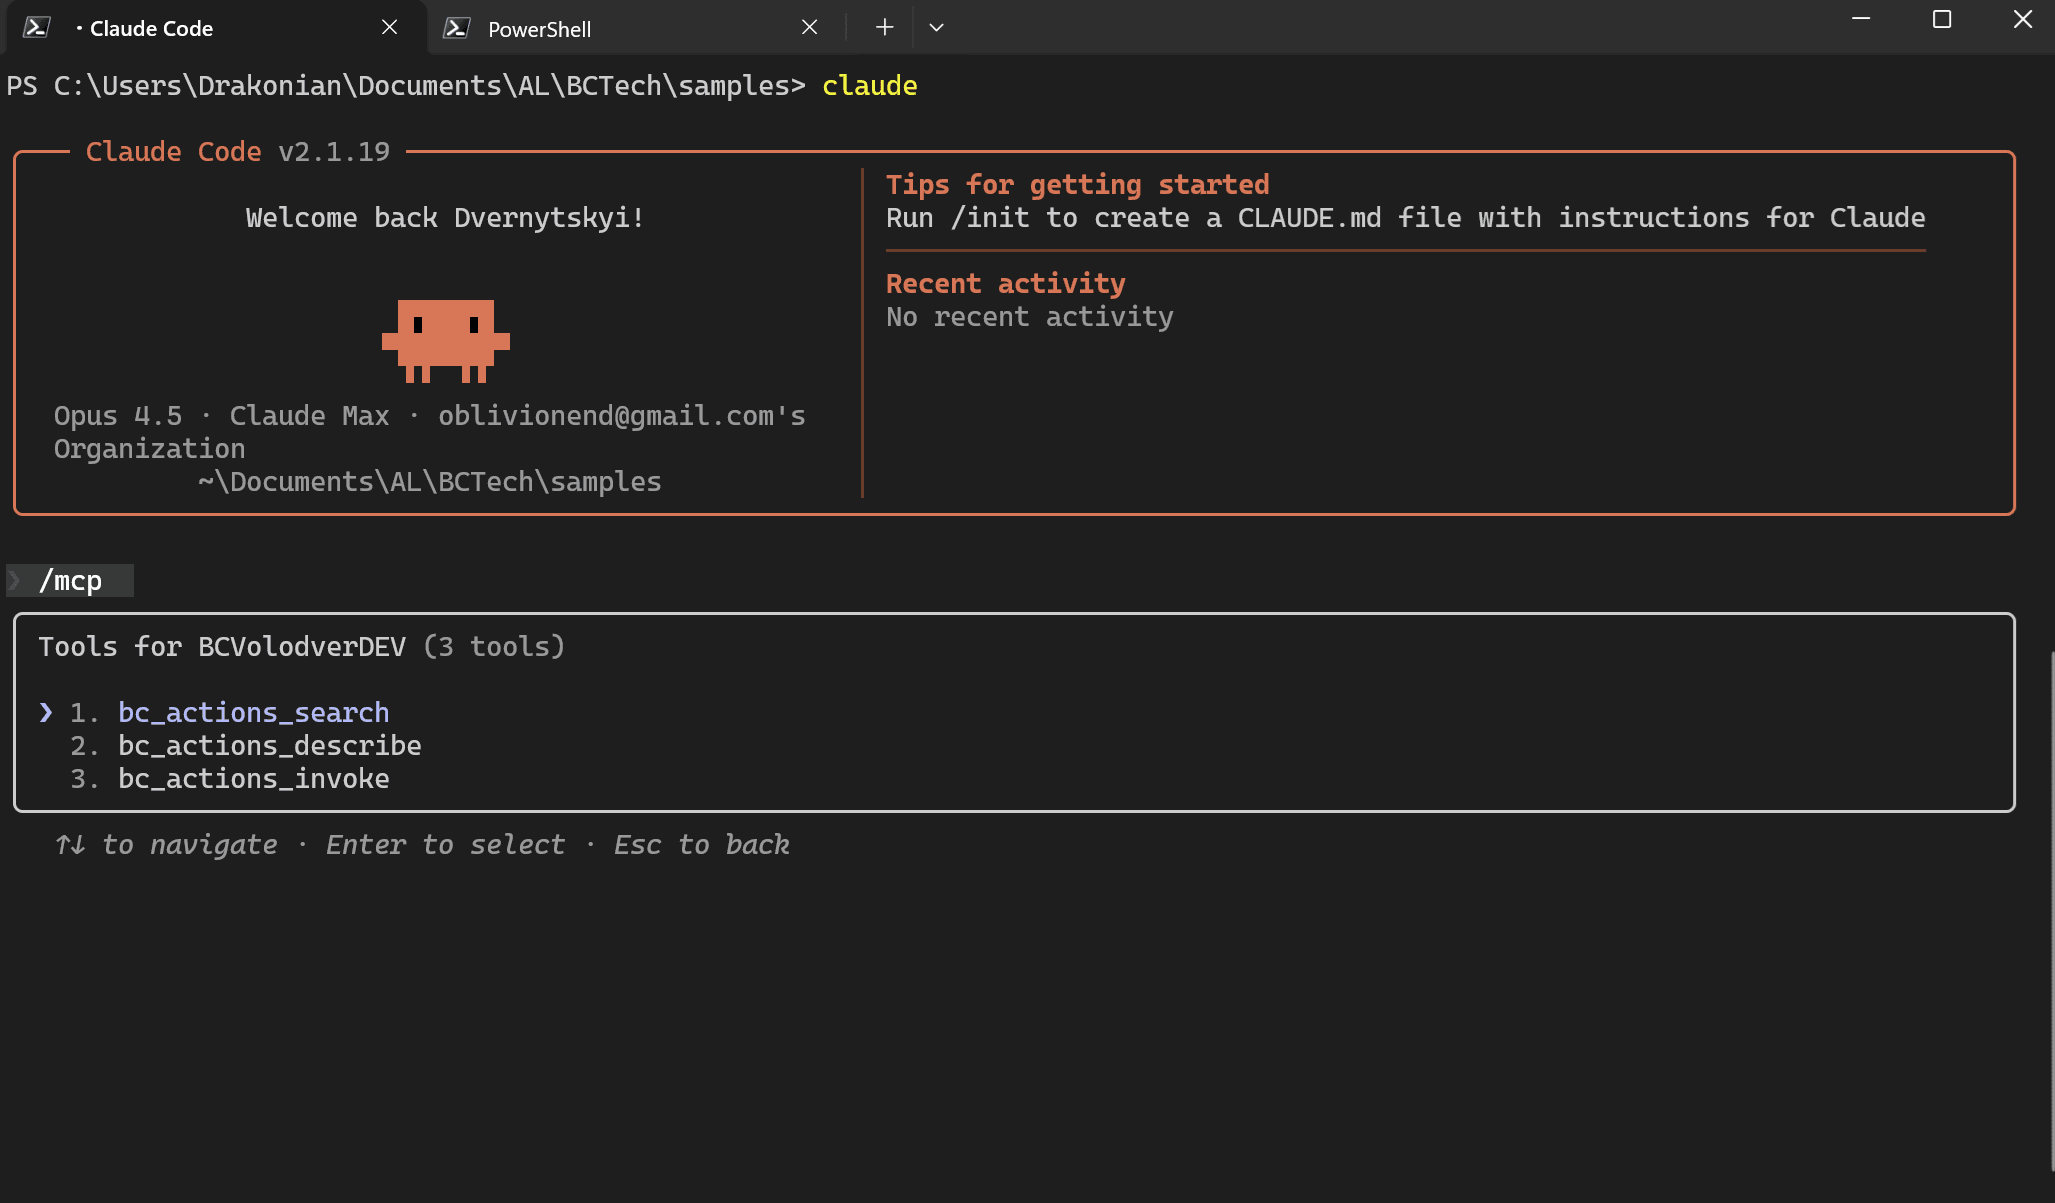
Demo
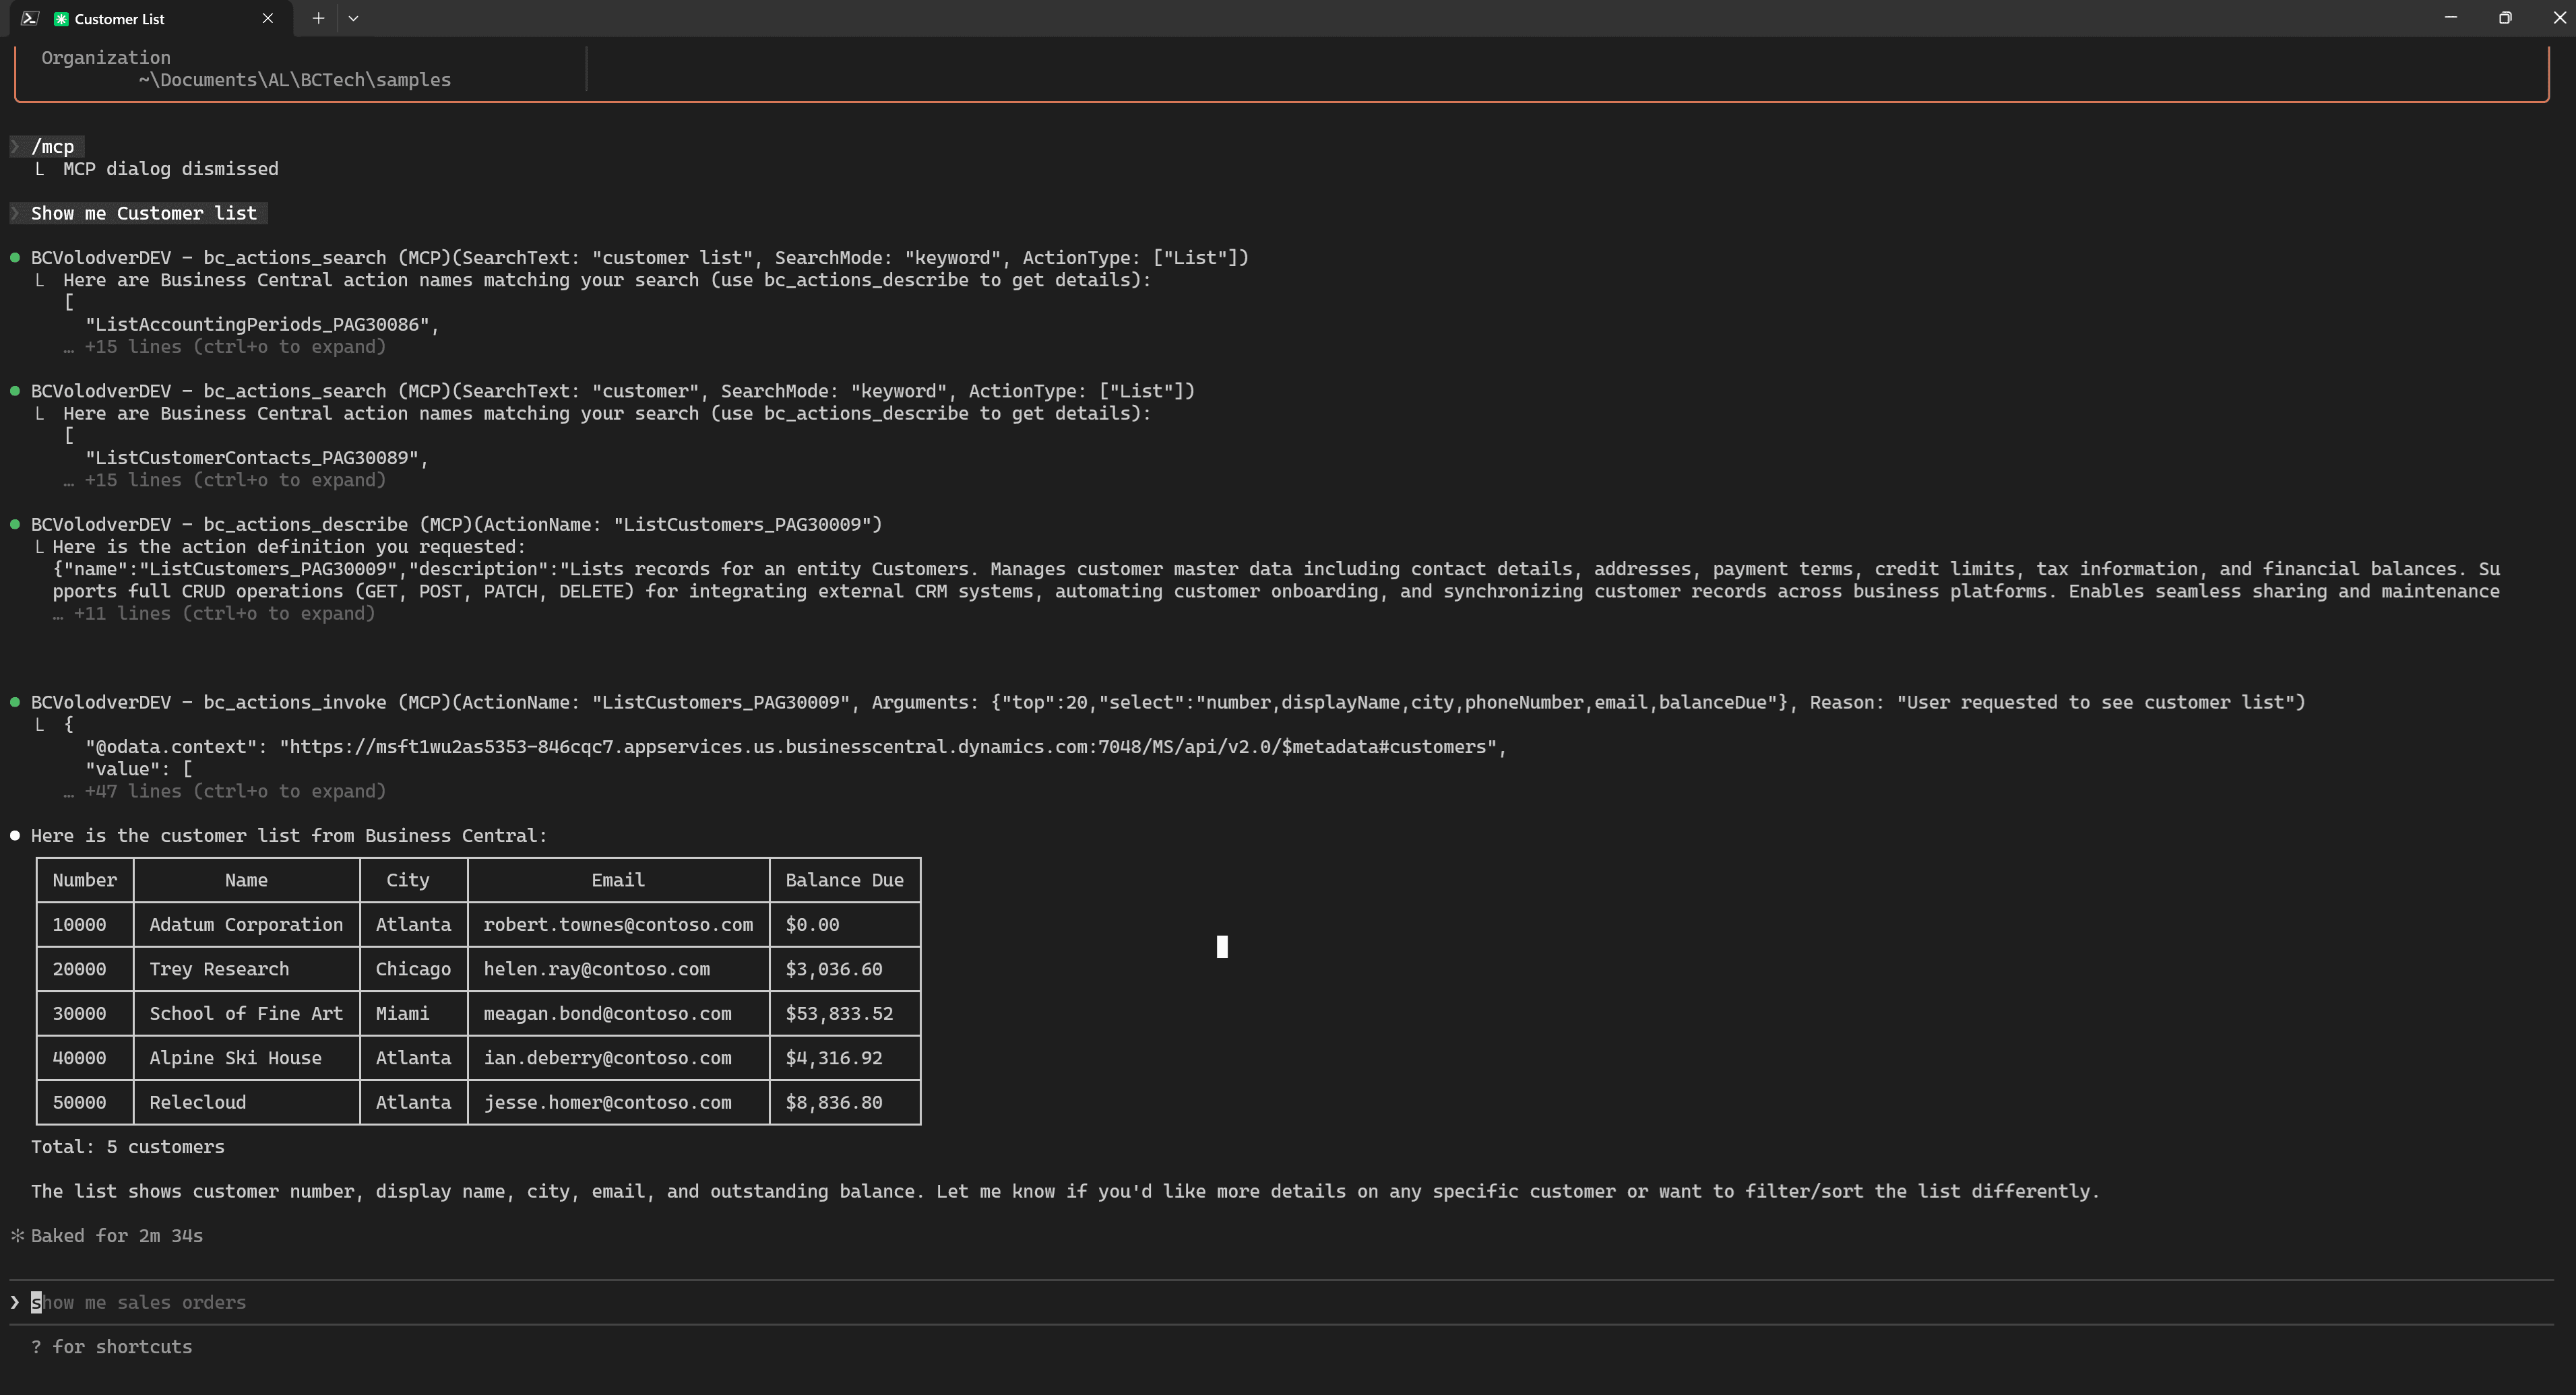
Let us look at some usage examples. For example ask something simple, related to the data in our Business Central environment, but not too specific, as example, Show customer list. As a result, we will get a list of customers with the main fields. It works!
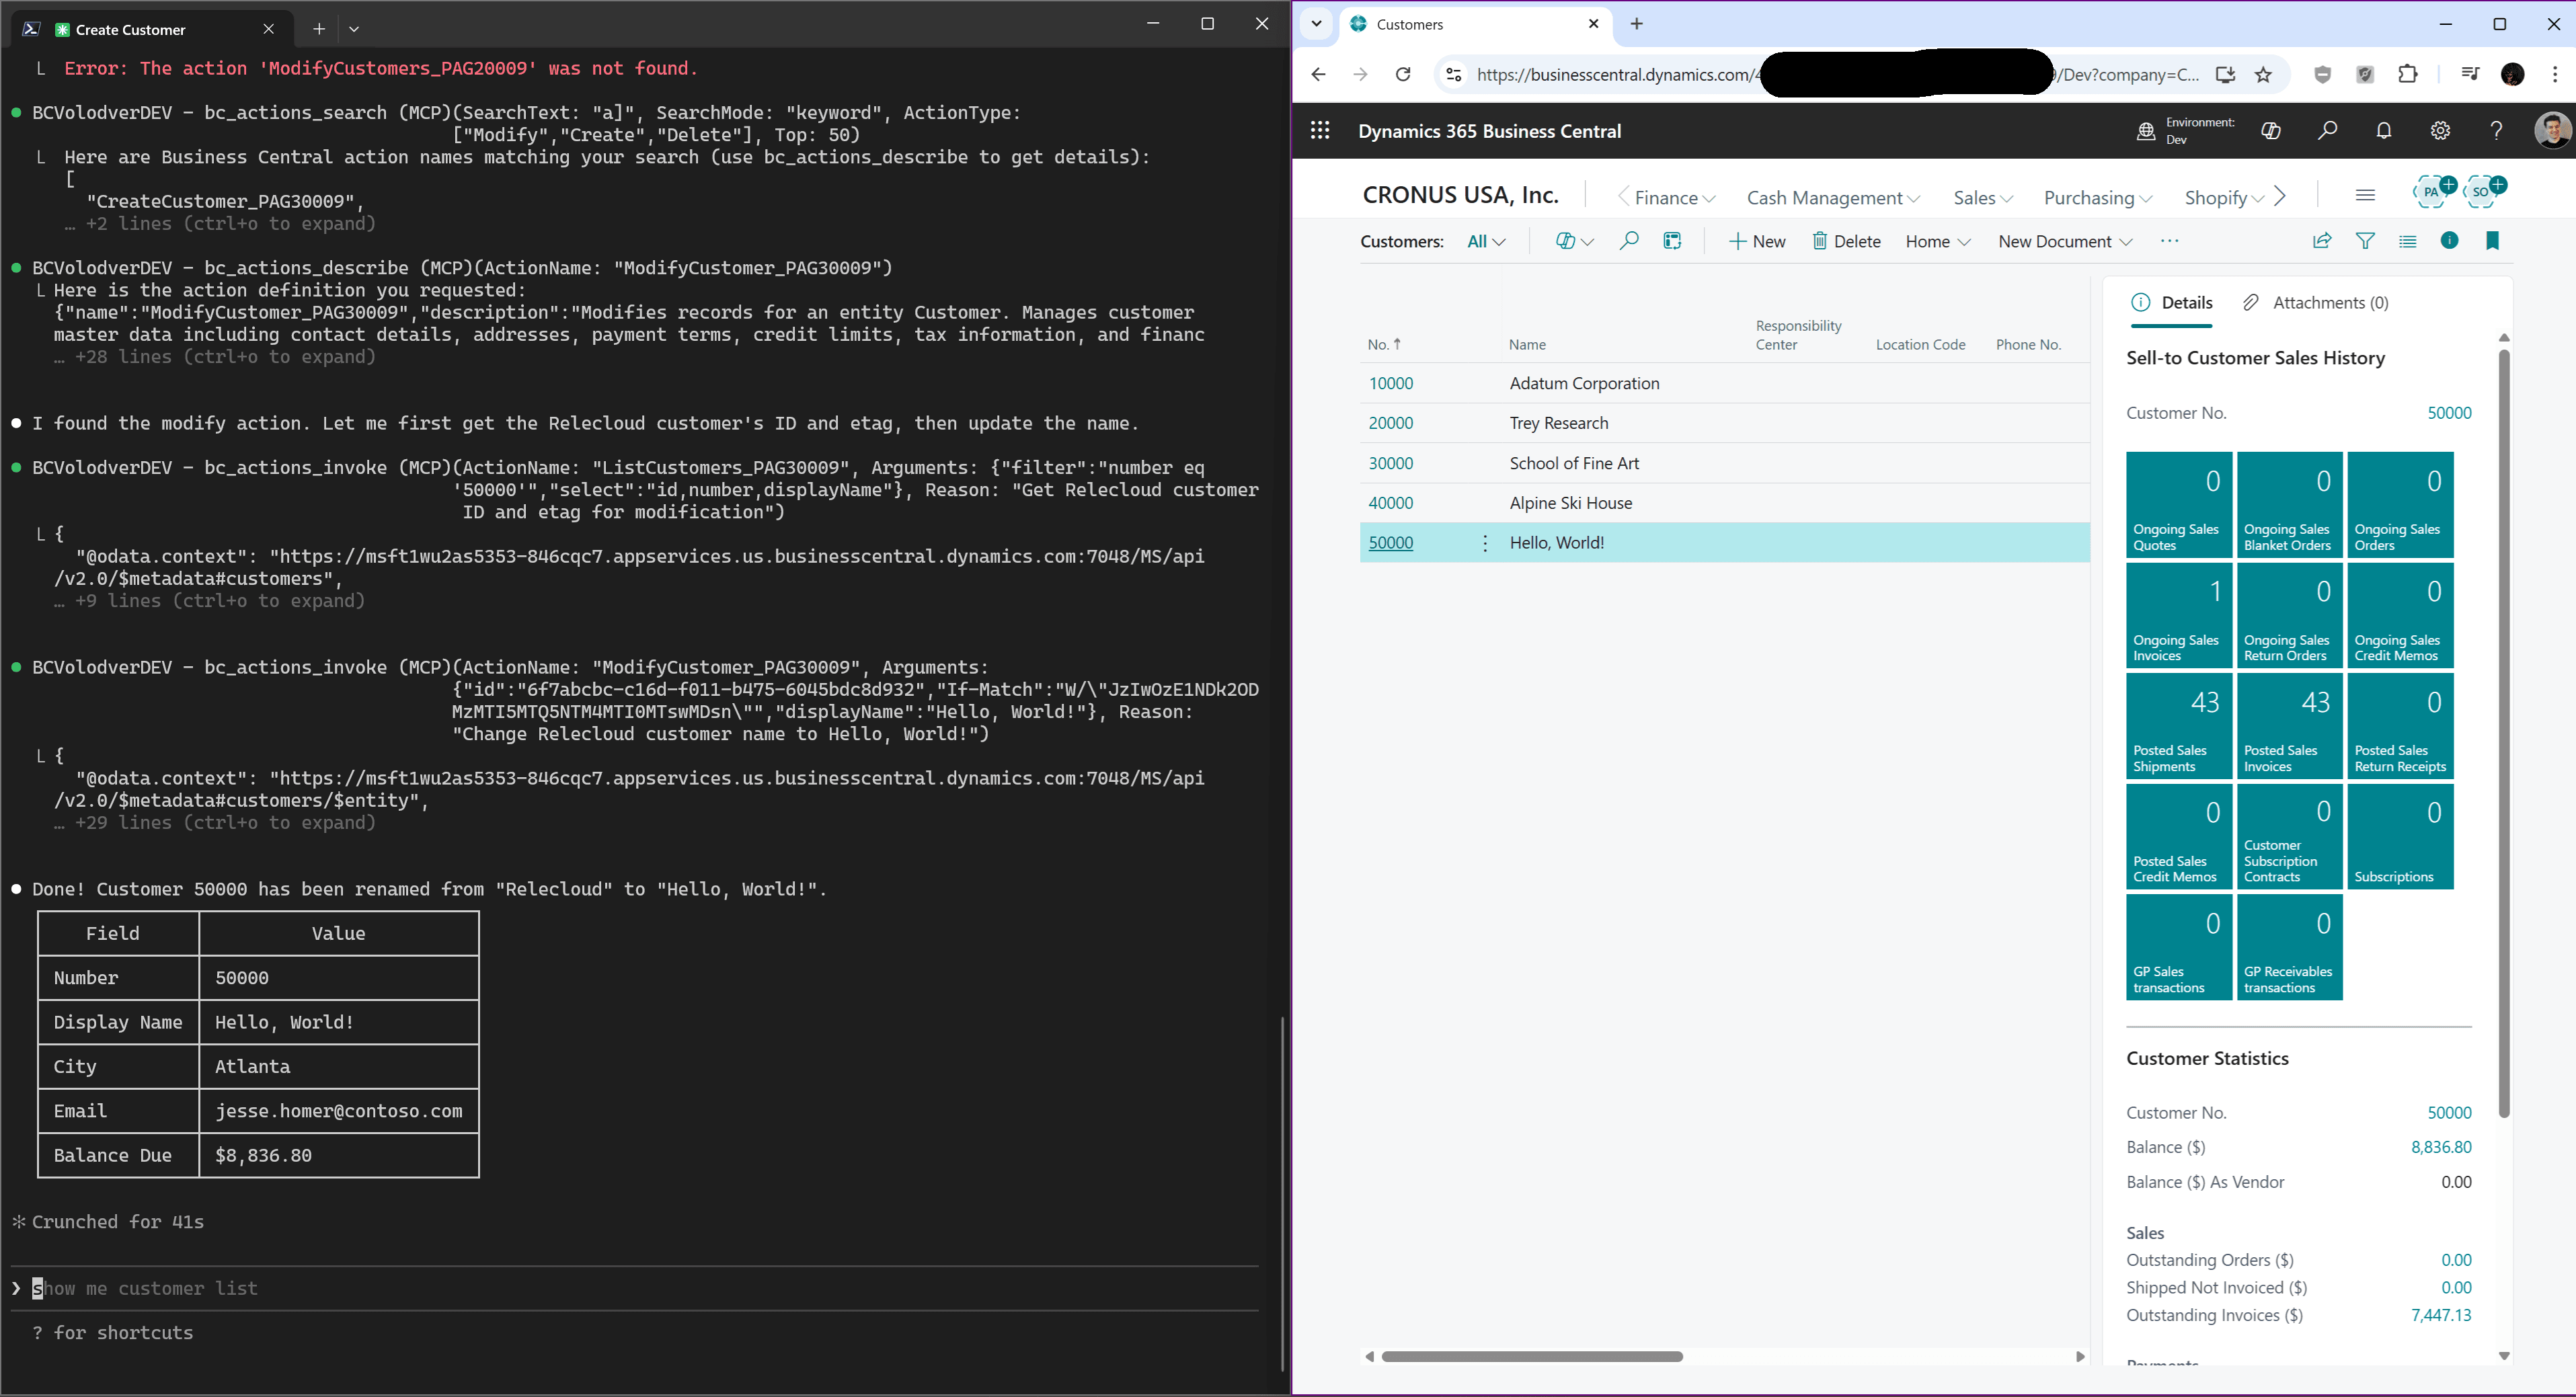
Or here is another example: let us try to modify data in Business Central from Claude Code by asking, Change the name of the Relecloud customer to "Hello, World!". As you can see, it works good.
Summary
We have now figured out how the Business Central MCP Server works and even integrated it into Claude Code. Of course, the proxy server is only a temporary solution, but I see huge potential in how these tools can evolve. And as we can see, it already works today.
As usual, I recommend treating AI as a potentially useful tool, but be careful about security and your data. When used properly, AI agents can genuinely help you in your daily work.